Want to let visitors upload files directly through your Contact Form 7? While this popular WordPress plugin doesn’t offer a File Upload field by default, don’t worry — adding one is easy with the help of a third-party plugin!
Imagine your forms going from basic to super functional, allowing users to send documents, images, or even PDFs along with their messages.
In this guide, we’ll walk you through the simple steps to enable file uploads, making your contact forms more dynamic and user-friendly.
Let’s get started!
Table of Contents
What is File Upload Field?
A File Upload Field is a form input element that allows users to select and upload files from their device directly through a web form.
This field enables visitors to attach documents, images, videos, or other files as part of their submission.
Making it ideal for contact forms, job applications, support tickets, or any situation where file sharing is required.
Why File Upload Field is Important in Contact Form 7?
The file Upload field can be beneficial for different purposes. Here are the key importance & benefits explained.
- Easy Submission of Documents: The File Upload field allows users to attach necessary documents, images, or files without needing to send them separately. This is especially useful for job applications, support requests, or event registrations.
- Improves User Experience: By integrating file uploads directly into your contact form, users can easily submit everything they need in one go. This eliminates the hassle of additional email attachments and simplifies the process.
- Fast Communication: It helps streamline communication by ensuring that important files (like contracts, invoices, or screenshots) are sent along with the user’s inquiry, making it easier for you to understand and respond to requests more effectively.
- Customization for Specific Needs: Adding a file upload field gives you the flexibility to customize your contact forms for specific needs, such as collecting resumes, project files, or images, enhancing your form’s versatility.
- Professional Look and Functionality: Providing a file upload option adds a professional touch to your forms. It makes your website look more polished and capable of handling complex user submissions, boosting trust with your visitors.
Must-Have Plugins to Add File Upload Field
How to Add File Upload Field in Contact Form 7?
Adding a file upload field to Contact Form 7 is a simple process that can be done with the help of a third-party plugin. In this guide, we’ll show you the quick steps to enhance your forms in this valuable field.
Enable File Upload
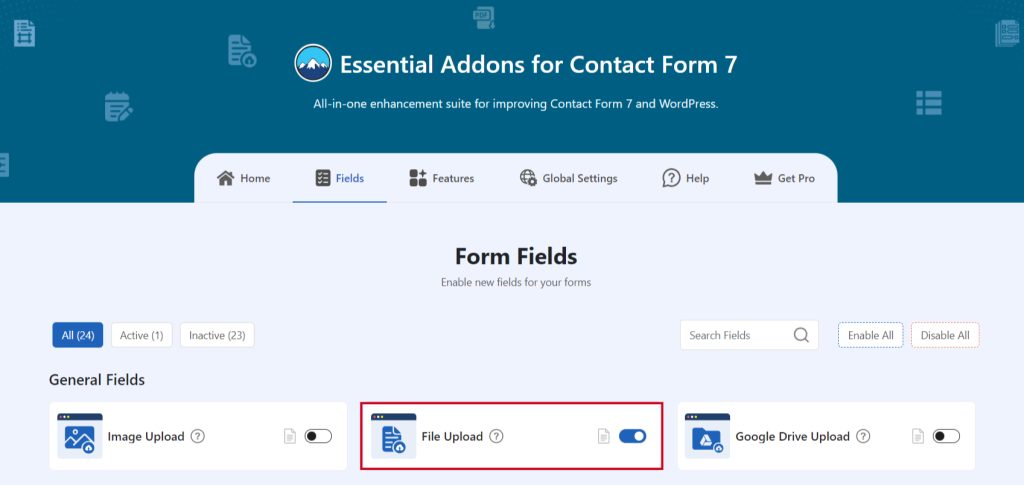
You must enable File Upload before implementing a drag-and-drop file upload field in Contact Form 7. To do that, follow the below steps:
- Navigate to the Contact Form 7 menu.
- Essential Addons.
- From the Fields tab enable the File Upload.
Add File Upload Tag
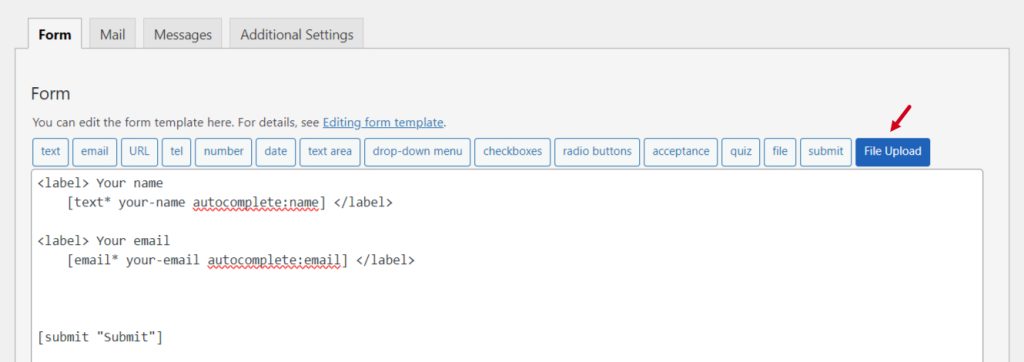
To implement the File Upload in your contact form follow the below steps:
- Navigate to any existing form or create a new one.
- Add the File Upload tag where you want to display in your form.
Configure File Upload
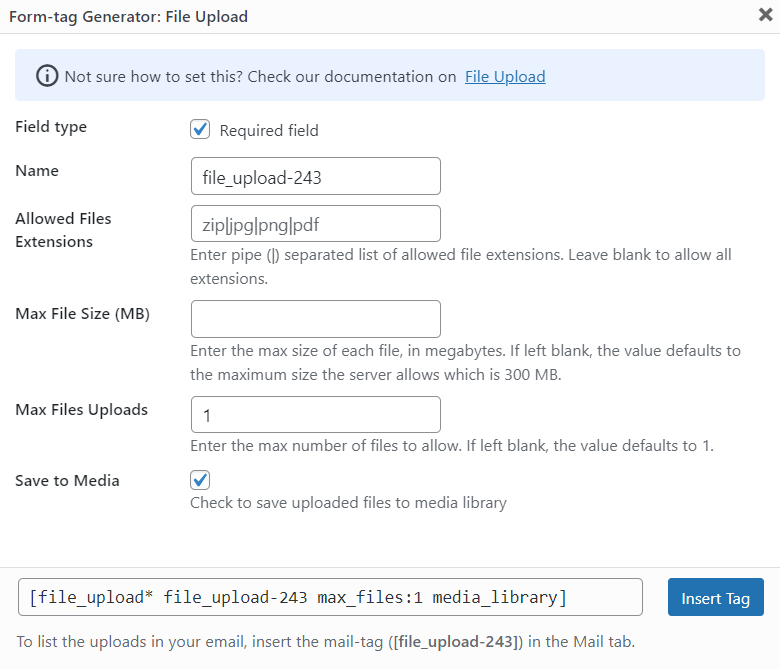
After clicking the File Upload Field tag a new popup window will appear. Here you can configure & customize the File Upload settings.
- Field Type: Tick or untick whether you want to mark it as required or not.
- Name: Usually the name field is auto-generated. You can add custom value if required.
- Allowed File Extensions: Type allowed file extensions. Enter pipe (|) separated list of allowed file extensions. Leave blank to allow all extensions.
- Max FileSize (MB): Enter the maximum size of each file, in megabytes. If left blank, the value defaults to the maximum size the server allows which is 300 MB.
- Max File Uploads: Enter the maximum number of files to allow. If left blank, the value defaults to 1.
- Save to Media: Allow uploaded files to be saved on the WordPress media library.
Click the Insert Tag button once the configuration is done. The customized tag will be added to your form editing panel. Save Changes.
Embed the Shortcode
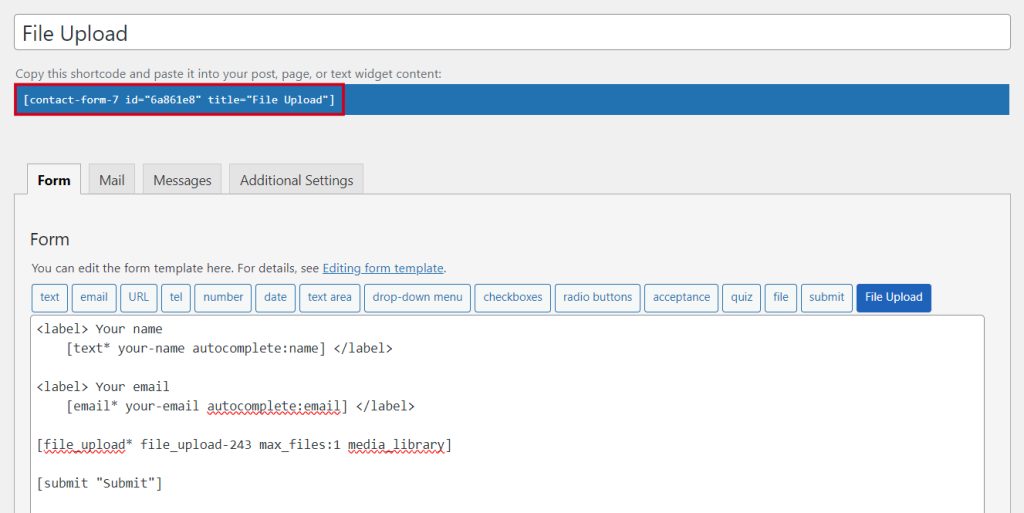
- Copy the Shortcode and paste it inside any page or post to display the File Upload field in your form.
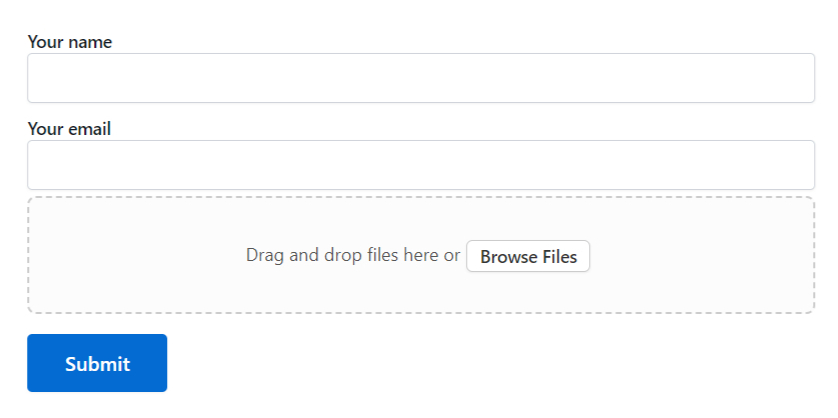
Output
Video Tutorial
Conclusion
And just like that, your Contact Form 7 is now supercharged with the ability to accept file uploads!
Whether you’re collecting resumes, images, important documents, or even fun files from your users, this simple yet powerful upgrade can make your forms more dynamic and user-friendly.
No more lost attachments or clunky email exchanges – everything you need will be right at your fingertips.
So, go ahead and add that file upload field, and watch your forms evolve from basic to brilliant, making every user interaction smoother, faster, and more efficient. Your forms are now ready to work smarter, not harder!
