Looking to gather dates and times from your users through Contact Form 7? You’re in the right place!
While Contact Form 7 doesn’t include a built-in Date & Time field, don’t fret. With the process, you can effortlessly add date & time fields to your forms.
Whether it’s for event bookings or appointment scheduling, let’s show you how to supercharge your forms and make time management a breeze!
What is Date Field?
A Date Field is an input field in a form that allows users to select or enter a specific date, typically in a standardized format (e.g., MM/DD/YYYY or DD/MM/YYYY).
It is commonly used for collecting information such as birthdates, event dates, deadlines, or any other data where selecting a particular day is required.
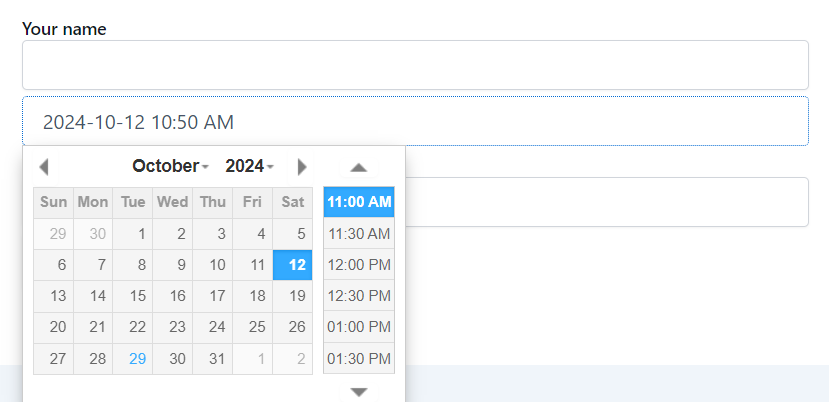
In web forms, the Date Field is often displayed as a calendar popup, allowing users to choose a date from a visual calendar interface. This ensures accuracy and consistency in the data collected.
What is Time Field?
A Time Field is an input field in a form that allows users to select or enter a specific time, typically in hours and minutes (e.g., 09:30 AM or 14:45).
It is commonly used for gathering information such as appointment times, event schedules, or any other time-related data. In web forms, the Time Field may be presented as a dropdown menu or a time picker, enabling users to choose a time with ease and ensuring standardized input.
This field helps streamline data collection and minimizes errors related to time formats.
Why Date & Time Field is Important in Contact Form 7?
Integrating Date & Time fields into your Contact Form 7 can significantly enhance its functionality, making it more practical for event bookings, appointments, and scheduling.
Here’s why you should consider adding them:
- Efficient Scheduling and Booking: With the Date & Time fields, users can easily select a date and time for appointments or events, simplifying the scheduling process. This eliminates the need for follow-up emails or back-and-forth communication to confirm availability.
- Improved User Experience: A built-in Date & Time picker makes the form more intuitive and user-friendly. Users can quickly choose their preferred date and time without worrying about formatting errors or confusing input fields.
- Accuracy and Consistency: By using the Date & Time fields, you ensure that all data is entered in a consistent, standardized format. This reduces the chances of errors, like incorrect dates or time zones, and helps you manage submissions more efficiently.
- Saves Time: Automatically collecting the right date and time information saves time for both form submitters and administrators. You won’t have to manually interpret dates or handle ambiguous submissions, making the whole process faster and more reliable.
Must-Have Plugins to Add Country Dropdown Field
How to Add Date & Time Fields in Contact Form 7?
Adding Date & Time fields to your Contact Form 7 is simple with the right tools. In this section, we’ll walk you through the steps to enhance your form with these essential fields.
Enable Date Time Field
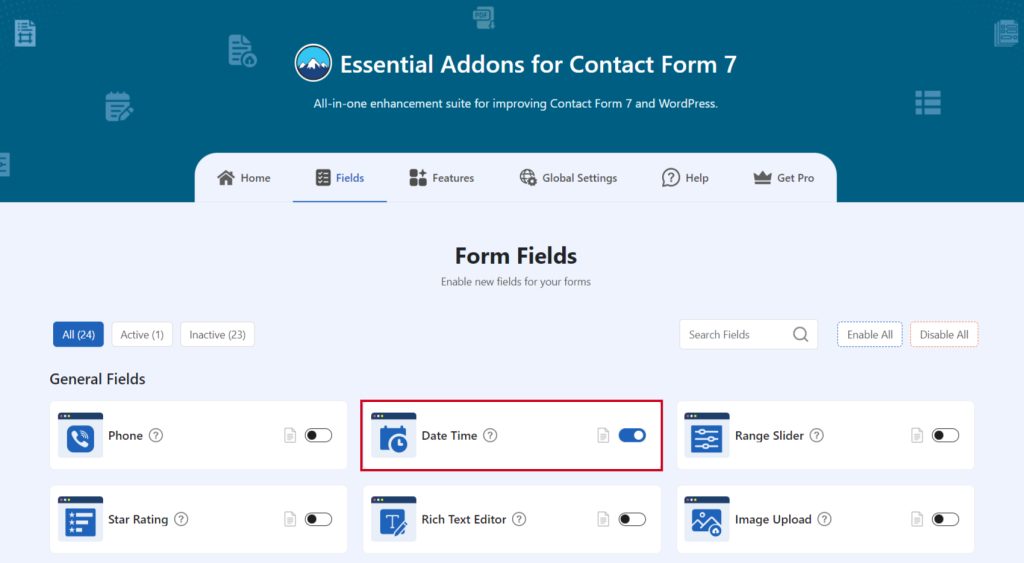
You must enable the Date Time Field before implementing the Date & Time field in Contact Form 7. To do that, follow the below steps:
- Navigate to the Contact Form 7 menu.
- Essential Addons.
- From the Fields tab enable the Date Time Field.
Add Date Time Tag
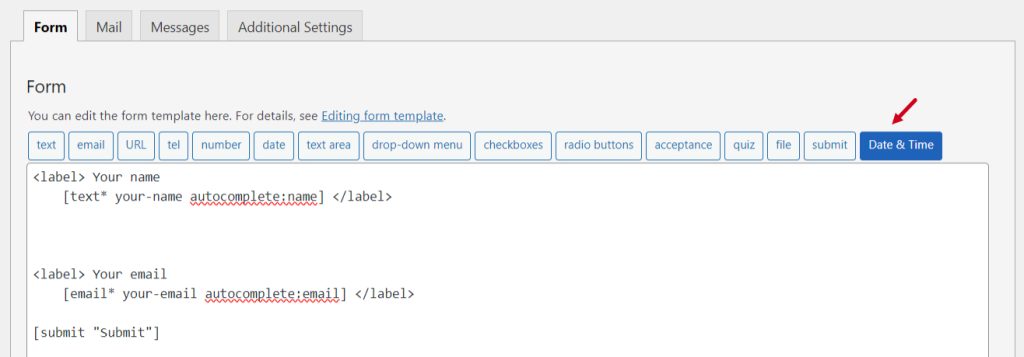
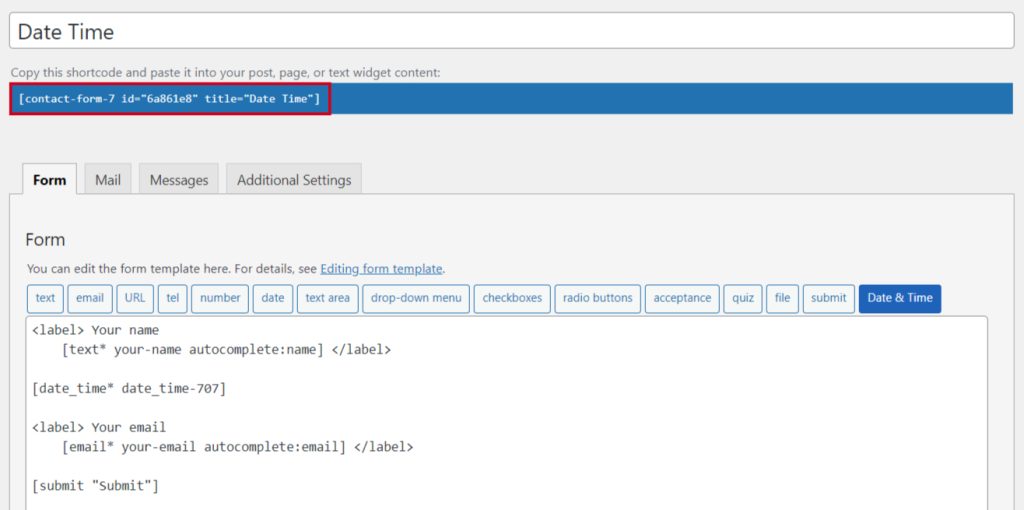
To implement the Date & Time in your contact form follow the below steps:
- Navigate to any existing form or create a new one.
- Add the Date & Time tag where you want to display it in your form.
Configure Date Time Field
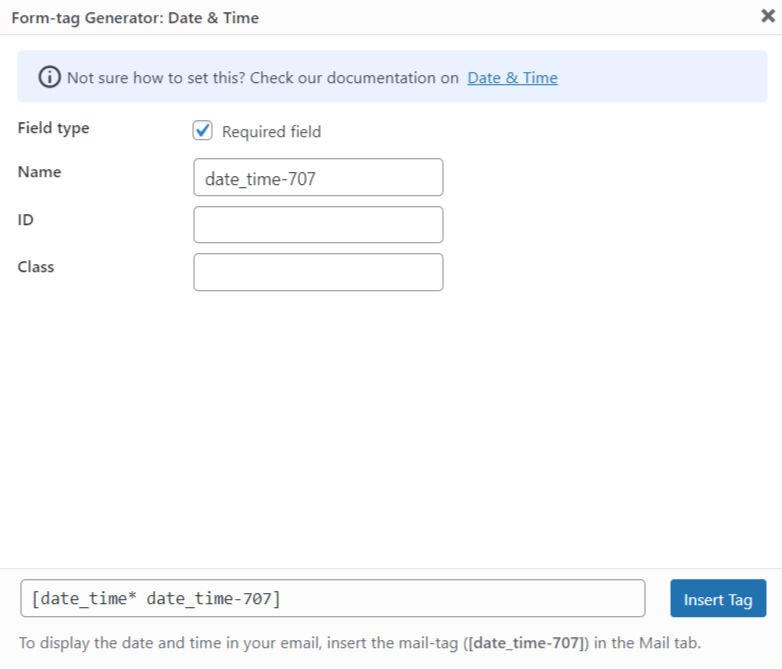
After clicking the Date Time tag a new popup window will appear. Here you can configure & customize the Date & Time settings.
- Field Type: Tick or untick whether you want to mark it as required or not.
- Name: Usually the name field is auto-generated. You can add custom value if required.
- ID: Enter custom ID if required.
- Class: Enter custom class attributes if required.
Click the Insert Tag button once the configuration is done. The customized tag will be added to your form editing panel. Save Changes.
Embed the Shortcode
- Copy the Shortcode and paste it inside any page or post to display the date & time field in your form.
Output
Video Tutorial
Conclusion
And just like that, your Contact Form 7 is all set to handle dates and times with ease! By adding these fields, you’re not just improving functionality—you’re creating a smoother, more efficient experience for your users.
Whether it’s scheduling appointments or managing event bookings, you’re now equipped to collect accurate, organized data with minimal fuss.
So, go ahead—supercharge your forms and make time work for you!
