Want to make your Contact Form 7 more dynamic and user-friendly? While it’s a great plugin for handling forms, it doesn’t include an image upload feature by default.
But don’t worry!
Adding an image upload field is easier than you think with the help of a third-party plugin. In this guide, we’ll show you how to spice up your form, so your users can upload images effortlessly.
Get ready to give your website visitors a seamless way to share pictures – no coding skills required! Let’s dive in!
Table of Contents
What is Image Upload Field?
An Image Upload Field is a feature in online forms that allows users to attach and submit image files directly through the form.
It provides a button or input area where visitors can browse their device, select an image, and upload it as part of the form submission.
This field is commonly used for applications, feedback forms, product submissions, and any scenario where images need to be shared with the form owner.
The uploaded images are typically stored on the server or emailed to the form administrator.
Why Image Upload Field is Important in Contact Form 7?
Adding an image upload field to Contact Form 7 can significantly enhance its functionality and user interaction. Whether it’s for feedback, product support, or creative submissions, this feature streamlines communication and boosts efficiency.
- Visual Feedback for Designers: Designers can request specific design feedback by allowing users to upload screenshots, helping them understand exactly what needs tweaking. This leads to faster revisions and satisfied clients.
- Product Support with Proof: Customers encountering product defects can upload clear images of the issues directly via the form, speeding up troubleshooting and enhancing support efficiency.
- Event Registration with Personal Photos: For event registrations or contests, users can submit images of their entries, making the process seamless and interactive. It also allows organizers to easily visualize all submissions in one place.
- Portfolio Submissions Made Easy: Artists, photographers, and other creatives can accept portfolio images directly through the form, streamlining submissions for job applications or project collaborations. It keeps everything organized and accessible.
- Real-Time Visual Communication: When users face technical issues, allowing them to upload error screenshots directly with their message helps support teams understand the problem immediately, reducing the time spent explaining.
- Better Collaboration in Team Projects: Teams working on collaborative projects can use the image upload field to submit visual drafts or sketches. It fosters faster feedback loops and keeps all visuals tied to the right project.
- Enhances E-Commerce Returns & Exchanges: If a customer wants to initiate a return or exchange, they can easily upload images of the damaged or incorrect items, speeding up the review process and making it more transparent.
Must-Have Plugins to Add Image Upload Field
How to Add Image Upload Field in Contact Form 7?
Adding an image upload field to Contact Form 7 makes your forms more interactive and efficient. Here are the step-by-step guidelines on how you can add an image upload field in contact form 7.
Enable Image Upload
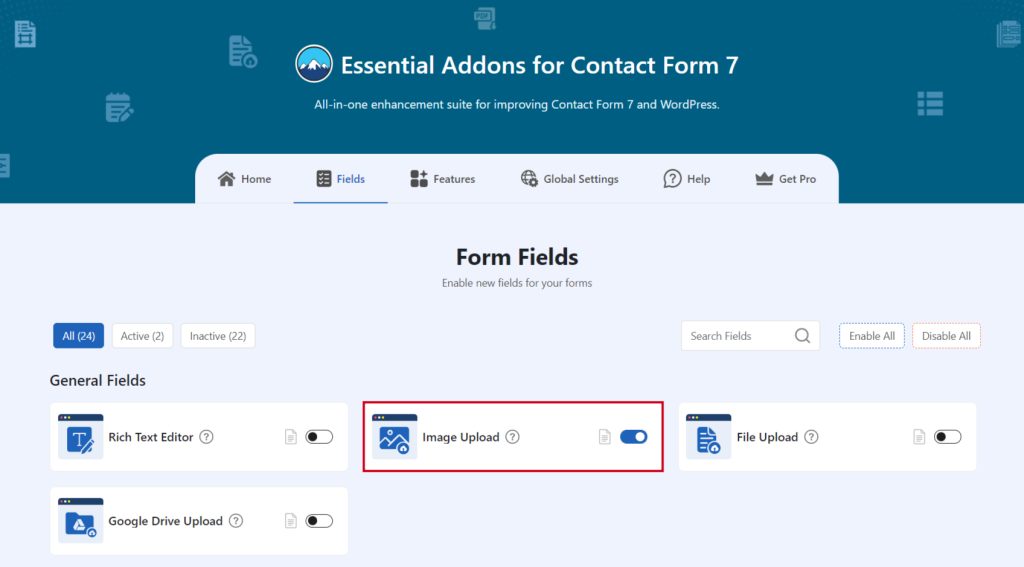
You must enable Image Upload integration before implementing a drag-and-drop image upload field in Contact Form 7. To do that, follow the below steps:
- Navigate to the Contact Form 7 menu.
- Essential Addons.
- From the Fields tab enable the Image Upload.
Add Image Upload Tag
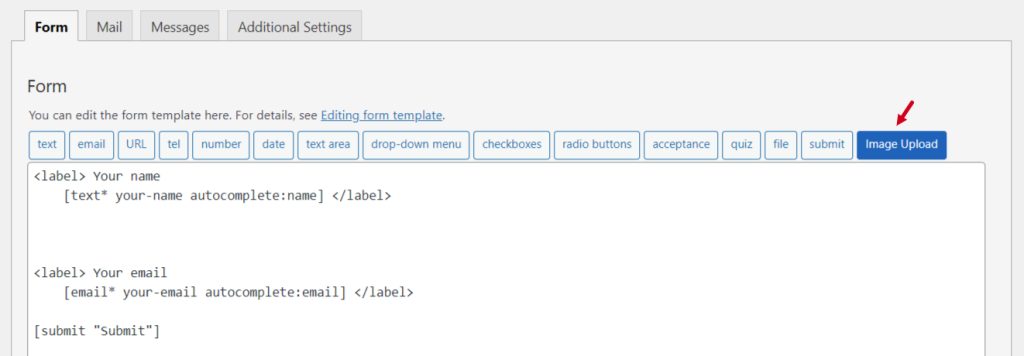
To implement the Image Upload in your contact form follow the below steps:
- Navigate to any existing form or create a new one.
- Add the Image Upload tag where you want to display in your form.
Configure Image Upload
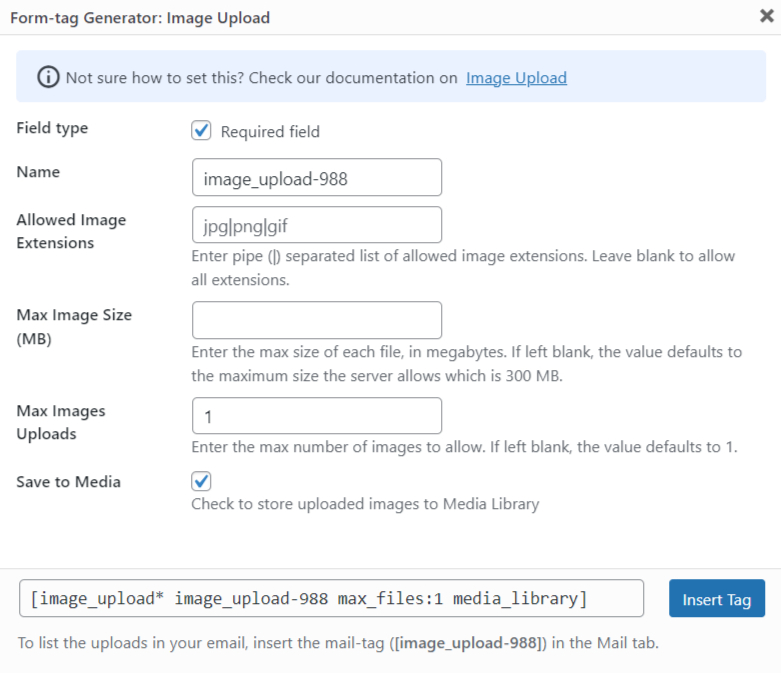
After clicking the Image Upload Field tag a new popup window will appear. Here you can configure & customize the Image Upload settings.
- Field Type: Tick or untick whether you want to mark it as required or not.
- Name: Usually the name field is auto-generated. You can add custom value if required.
- Allowed Image Extensions: Type allowed image extensions. Enter pipe (|) separated list of allowed image extensions. Leave blank to allow all extensions.
- Max Image Size (MB): Enter the max size of each file, in megabytes. If left blank, the value defaults to the maximum size the server allows which is 300 MB.
- Max Images Uploads: Enter the maximum number of images to allow. If left blank, the value defaults to 1.
- Save to Media: Allow uploaded images to be saved on the WordPress media library.
Click the Insert Tag button once the configuration is done. The customized tag will be added to your form editing panel. Save Changes.
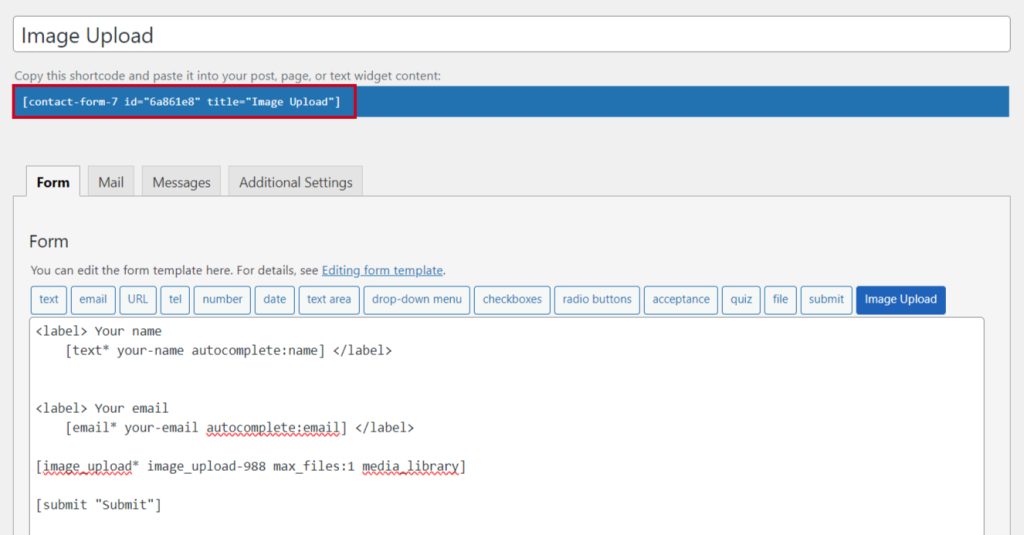
Embed the Shortcode
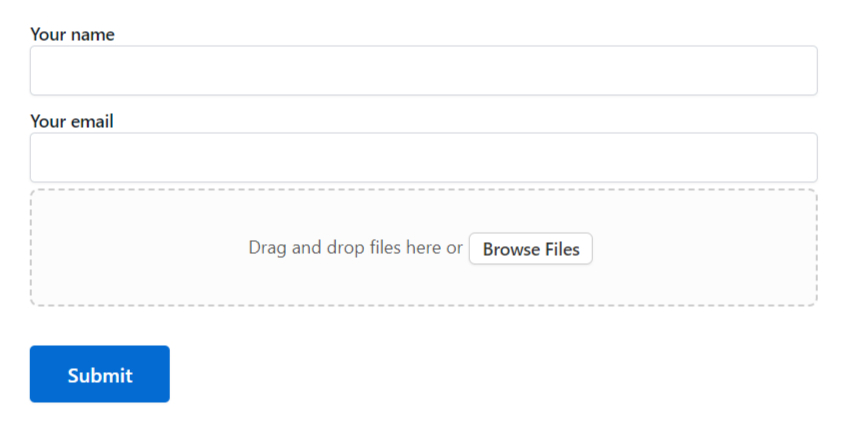
- Copy the Shortcode and paste it inside any page or post to display the image upload field in your form.
Output
Video Tutorial
Conclusion
Adding an image upload field to Contact Form 7 is a game-changer for both functionality and user interaction.
This simple feature opens up new possibilities, whether you’re collecting detailed feedback, offering faster support, or accepting creative submissions.
Visuals can communicate so much more than words, making the process smoother and more engaging for everyone involved.
Don’t settle for a basic form—let your Contact Form 7 become a powerful tool that improves your website’s communication and leaves a lasting impact on visitors.
