Managing files inside WordPress can get messy. Especially when you work with teams, clients, or contributors. Moving documents back and forth wastes time. Tracking versions becomes a headache.
That’s where Google Drive changes everything.
Imagine reviewing, approving, and managing files directly inside WordPress—without switching tabs or emailing updates. A simple workflow. A cleaner process. Faster decisions.
In this guide, you’ll learn how to enable Google Drive file review and approval in WordPress step-by-step. Whether you’re running a business site, a membership platform, or a client portal, this setup will save you hours.
Let’s make your file management smoother, smarter, and stress-free.
Table of Contents
What Does Review & Approve Mean?
“Review & Approve” is a workflow that helps you control and manage files before they are finalized or published. It means someone uploads a document, and another person checks it, gives feedback, and confirms whether it’s ready to move forward.
In other words, review is the process of examining a file for accuracy, quality, or completeness. Approval is the final confirmation that the file meets the required standards.
This workflow ensures that every document—whether it’s a contract, design, form, or piece of content—is correct, updated, and ready for use. It reduces mistakes, improves teamwork, and keeps all file changes organized and transparent.
In WordPress, adding a “Review & Approve” system for Google Drive files helps you manage documents professionally without leaving your site.
How Does Review & Approve Work?
The Review & Approve process follows a straightforward workflow. It’s designed to keep files organized and ensure that nothing gets published or shared without proper checks. Here’s how it works:
- Upload or Share a File: Someone adds a Google Drive file that needs attention—this could be a document, image, spreadsheet, or any project asset.
- Reviewer Gets Notified: The assigned reviewer receives a notification inside WordPress or by email. They know exactly which file needs their attention.
- Reviewer Checks the Content: The reviewer opens the file directly from WordPress. They read, inspect, or analyze the content to make sure everything is correct.
- Feedback or Changes Are Added: If something needs fixing, the reviewer leaves comments or requests changes. This keeps communication clear and organized in one place.
- File Gets Approved or Rejected: Once the reviewer is satisfied, they click Approve.
If the file isn’t ready, they select Reject and send it back for updates. - Final Version Moves Forward: Approved files get green-lit for publishing, sharing, or internal use. Nothing slips through the cracks.

Benefits of Using Review & Approval Method?
Using a structured Review & Approval workflow brings clarity, control, and consistency to your file management—especially when working with teams, clients, or contributors. Here are the key benefits:
- Fewer Mistakes: Every file is checked before it moves forward. This reduces errors, outdated content, and miscommunication.
- Clear Accountability: You always know who reviewed what and who approved which version. No more guessing or digging through emails.
- Faster Collaboration: Reviewers receive notifications instantly. Feedback is shared in one place. Work moves faster because no steps are missed.
- Better Organization: All comments, changes, and approvals stay linked to the file. You get a clean, trackable workflow instead of messy file exchanges.
- Improved Professionalism: Clients and team members see a structured process. It feels organized, trustworthy, and efficient.
- Version Control Made Easy: No more duplicate files or lost edits. You always work on the latest version.
- Saves Time: Instead of endless back-and-forth emails, everything happens in an organized workflow directly inside WordPress.
- Reduces Miscommunication: Feedback is clear. Changes are documented. Everyone stays aligned.
- Works for Any Type of Document: Contracts, images, spreadsheets, forms, content drafts—every file benefits from an approval layer.
How to Set Up Review & Approve for Google Drive Files?
Setting up a Review & Approve system for your Google Drive files in WordPress is easier than you might think. With the right tools, you can create a smooth, automated workflow that keeps every document organized and properly checked before it moves forward.
Follow the steps below to connect Google Drive, enable review features, and streamline your approval process.
Step-1: Install Necessary Plugins
- Navigate to Plugins from the WordPress admin dashboard > Add New.
- Search for Integrate Google Drive.
- Install & Activate the plugin.
Step-2: Choose Review & Approve Module
- Navigate to Google Drive > Module Builder.
- Click on Add New Module.
- Select the Review & Approve Module.
- Rename the module title if required.

Step-3: Configure Source Tab
- Select your Google Drive files.
- Your selected items will be highlighted on the right side.
- Arrange the items by dragging them up or down.
Here is the detailed breakdown for each setting you will discover there:
- All Folders & Files: If All Folders & Files is enabled, visitors can navigate through all the folders & files of all the linked Google Drive accounts.
- Use Private Files: Turn ON to upload the files in the private folder linked to the user. Note: If enabled this module will be visible only to logged-in users.
- Use ACF field Files: Enable this option to use the ACF field files dynamically as the source for the module. Enter the ACF field name in the ACF Field Key input box to use the files from the ACF field.

Step-4: Configure Filter Tab
If you want to include/ exclude something, this step will be helpful for you. Below we break down the functionality you can configure in the Filter tab:
- Show Files: Exclude any files from this option. If turned off, files won’t show.
- Show Folders: Exclude any folders from this option. If turned off, folders won’t show.
- Allowed Extensions: Enter comma (,) separated file extensions to allow, such as “jpg, png, gif”. Leave empty to show all extension files. When “Allow all” is enabled, exceptions will not be displayed.
- Allowed Names: Enter file and folder names, separated by commas, to display. Leave blank to display all files and folders. When “Allow all” is enabled, exceptions will not be displayed.
- Maximum File Numbers: Enter the maximum number of how many files you want to show. Leave empty to show all files.

Step-5: Configure Advanced Tab
The next step is to set up advanced options. There are multiple customizations you can do depending on your test and needs. Let’s dive into the guide.
- Module Container: Set the module container width and height. You can use any valid CSS unit (pixels, percentage), eg ‘360px’, ‘780px’, ‘80%’. Keep blank for a default value.
- Browser View: Select the file browser view (Grid or List)
- Enable Lazy load: Enable files lazy load to avoid loading all files at once.
- Show Header: Show/ hide the file browser header.
- Sorting: Using this feature, you can sort files by Name, Size, Created Date, Modified Date, Ascending, or Descending Direction. Select the option you are thinking of implementing.

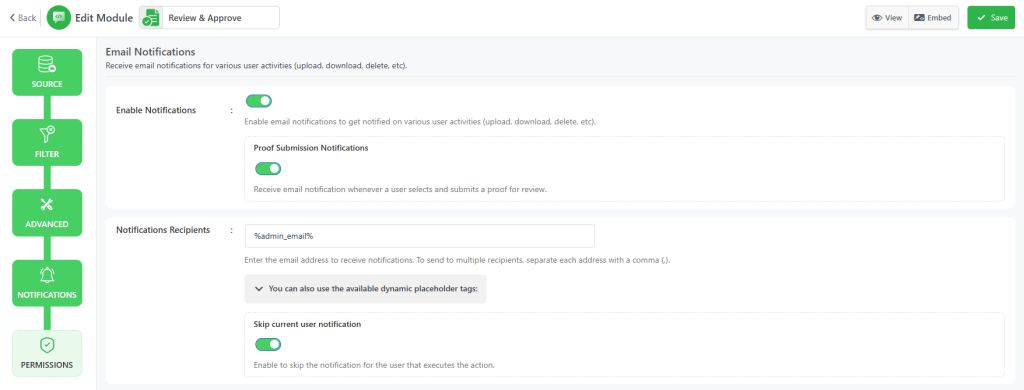
Step-6: Configure Notifications Tab
Now you can navigate to the Notifications tab, where you will customize the notification settings configuration.
- Enable Notifications: Enable email notifications to get notified on various user activities (upload, download, delete, etc).
- Notification Recipients: Enter the email address where the notifications will be sent. Add multiple email addresses by separating them with a comma (,). You can also set the placeholder tags below as email recipients.
Step-7: Configure Permissions Tab
After completing the Advanced options customization, head over to the Permission tab. Here you will mostly work on permission-related tasks.
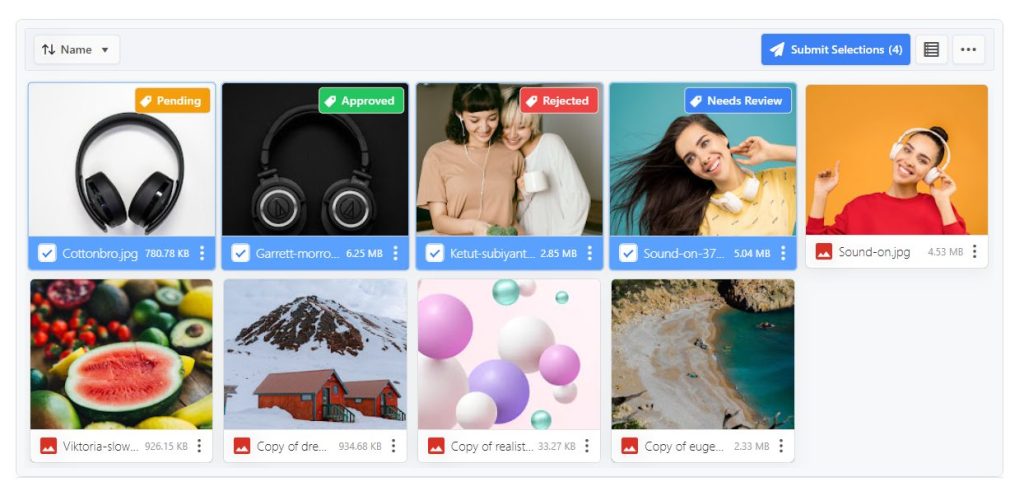
- Proof Selections: Configure proof selection settings to allow users to select & submit files for review.
- Preview: Allow users to preview files.
- Allow Search: Allow users to search for files.
- Enable Password Protection: Enable password protection for this module. Users will need to enter the password to access the module.
- Display For: Select the user roles and specific users who are allowed to access the module.
- Everyone: Set the module visibility to everyone.
- Logged In: Set the module visibility to logged-in users only.
- Show Denied Message: Show a message to users who don’t have access to the module.
- Display Login Screen: Display a login message for the modules when authentication is required.

While you have finished everything, click Save Changes and copy the shortcode. Now you can use the shortcode to display the Review & Approve Module inside any posts or pages.
Output
Conclusion
Enabling Google Drive file review and approval in WordPress is one of the easiest ways to keep your workflow organized, efficient, and fully controlled. With a structured process in place, you reduce errors, speed up collaboration, and make sure every document meets your standards before it moves forward.
Whether you’re working with clients, team members, or contributors, this setup brings all your files into one smooth system—right inside WordPress. No more switching tabs. No more scattered feedback. Just a clean, streamlined approval process that helps everyone stay aligned.
Now that you know how to set it up, you’re ready to create a more professional, reliable, and time-saving document workflow for your website. If you want to take it even further, you can explore advanced automations, role permissions, or additional integrations to enhance your file management experience even more.