Google Drive is a powerful cloud storage platform that allows you to store, share, and collaborate on files with others, while WordPress is a popular content management system that powers millions of websites worldwide. By integrating these two platforms, you can easily share your Google Drive files on your WordPress website, making them easily accessible to your website visitors.
In this guide, we’ll show you step-by-step how to share your Google Drive files, folders, and documents on your WordPress website using various methods, including plugins and Google Drive embeds.
Why Share Google Drive Files, Folders & Documents on WordPress Website?
Sharing Google Drive files, folders, and documents on your WordPress website can be highly beneficial for a variety of reasons. Here are some of the main advantages:
Easy Access: By sharing your Google Drive files on your WordPress website, you can provide easy access to your visitors without requiring them to have a Google account. Your visitors can simply access and download the files directly from your website.
Centralized Storage: Google Drive provides a centralized location for storing your files and folders, which can help streamline your workflow and make it easier to manage your files.
Collaboration: With Google Drive, you can easily collaborate on files and folders with others, making it ideal for teams or organizations that need to work together on documents or projects.
Enhanced Functionality: By integrating Google Drive with WordPress, you can enhance the functionality of your website by adding features such as file previews, sharing options, and collaboration tools.

Time-Saving: Sharing your Google Drive files on your WordPress website can save you time by eliminating the need to manually upload and manage files on your website. Instead, you can simply share the files directly from your Google Drive account.
Saves Your Hosting Space: Another advantage of sharing Google Drive files, folders, and documents on your WordPress website is that it can save your hosting space. Which might be concerning for most website owners.
Overall, integrating Google Drive with your WordPress website can provide many benefits, including easy access, centralized storage, collaboration, enhanced functionality, and time-saving. Whether you’re a blogger, small business owner, or website developer, sharing your Google Drive files on your WordPress website can help improve your workflow and enhance the user experience for your visitors.
Read Also: How To Create Google Drive Slider Carousel On WordPress Website
How to Share Google Drive Files, Folders & Documents on WordPress Website?
To share any type of Google Drive files, folders, or documents on your WordPress website, you have to take assistance from a plugin called Integrate Google Drive developed by the SoftLab team. So let’s directly move on to the main steps:
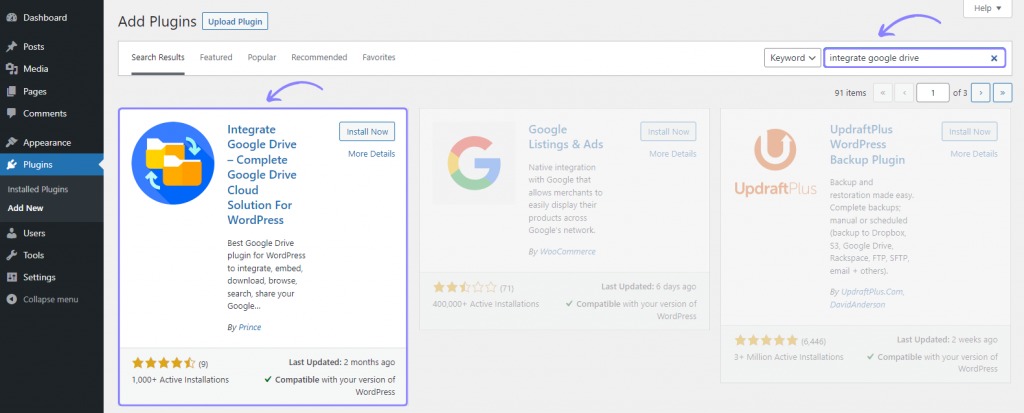
Step-1: Install & Activate Integrate Google Drive Plugin
To install Integrate Google Drive plugin, navigate to Plugins > Add New > Type Integrate Google Drive > Install & Activate the plugin.
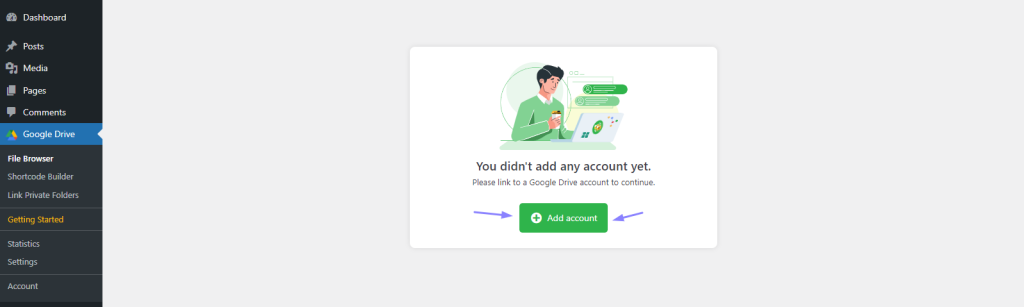
Step-2: Link Google Account
You must need to link your Google Account to create a video gallery. To link a Google Drive account, click Google Drive > Settings > Add Account > Click Google Account You want to Add > Allow necessary permissions.
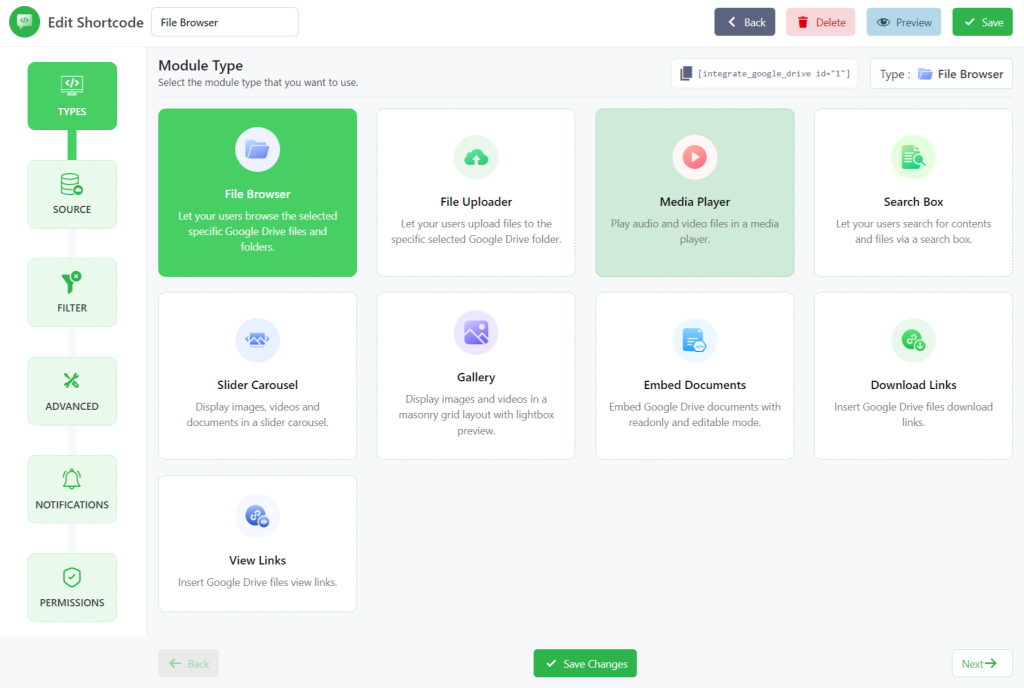
Step-3: Create File Browser Module
To create a File Browser Module, click on Shortcode Builder from the left middle side of your WordPress dashboard. Create a new Shortcode > select File Browser Module from the Media Types Tab. You can rename the shortcode module title from the upper left side of the screen.
Click Next.
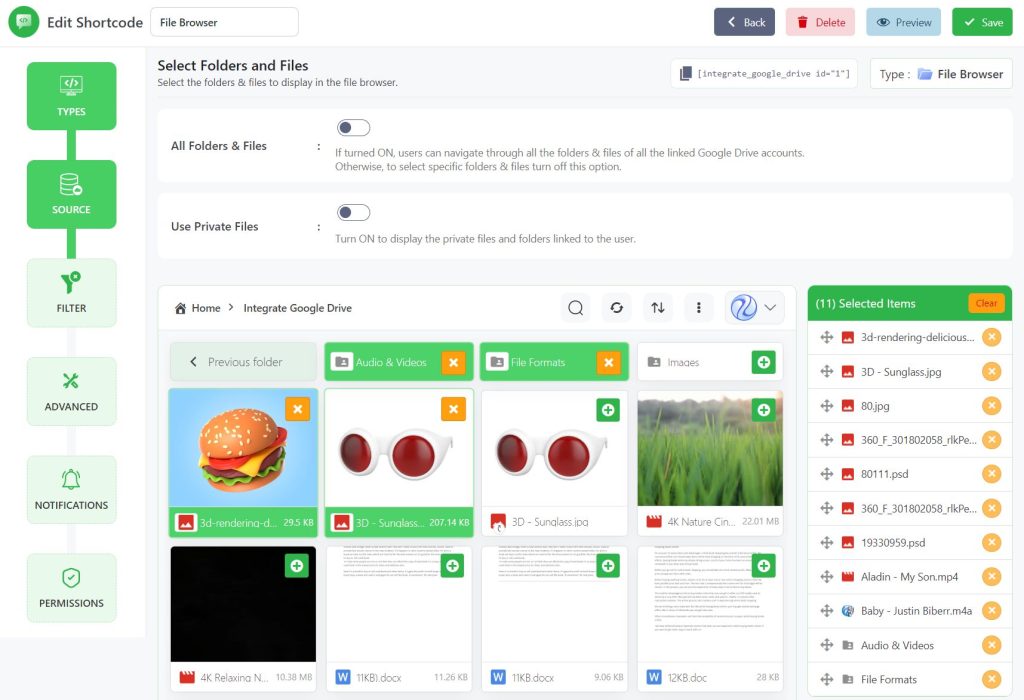
Step-4: Configure the Sources Tab
After selecting File Browser Module, you will select the files and folders that you expect to share publicly.
From the Sources Tab, select your files by pressing the plus sign icon on the right side of each file & folder. On the right side, your selected items will be highlighted.
Arrange them accordingly by simply dragging them up or down. While doing this process you will discover two ticking options (All Folders & Files & Use Private Folders).
All Folders & Files: If All Folders & Files is enabled, visitors can navigate through all the folders & files of all the linked Google Drive accounts.
Use Private Folders: On the other hand, if Use Private Folders is enabled, users can only navigate through the file & folder they are permitted to.
Click Next.
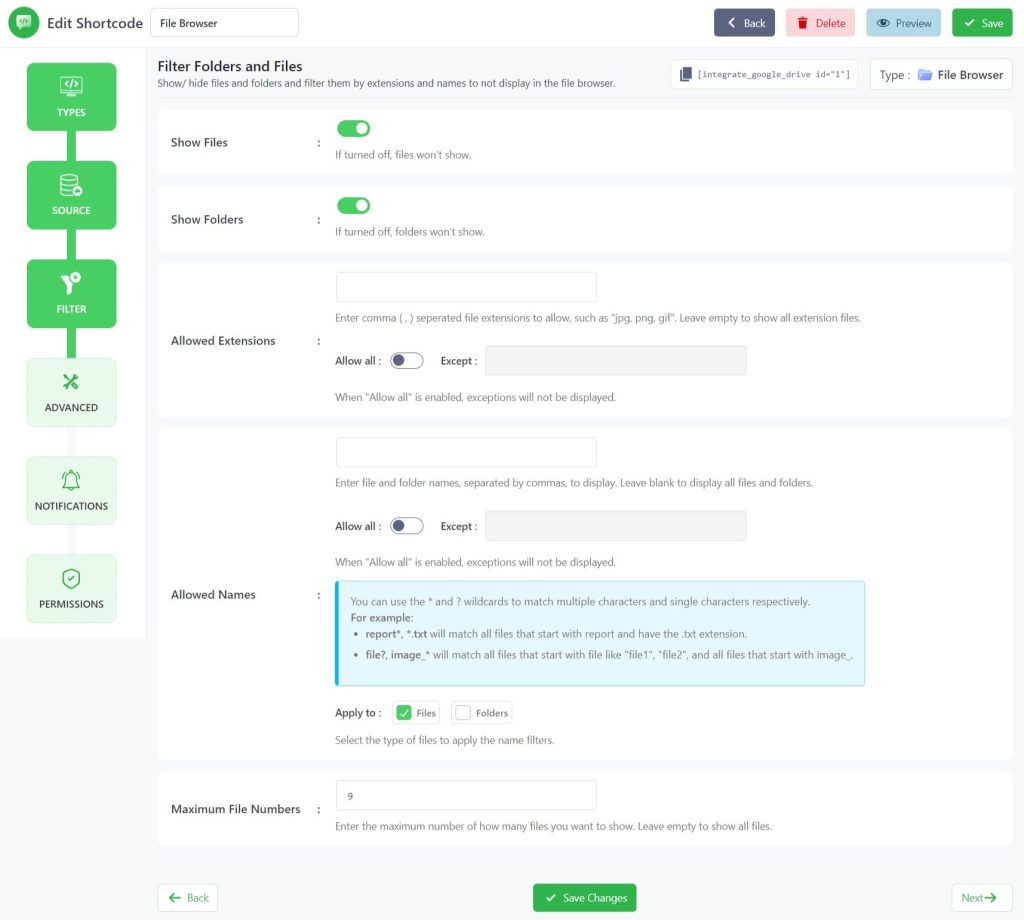
Step-5: Configuring Filter Tab
If you want to include/ exclude something, this step will be helpful for you. The Show Files & Show Folders options are given if you desperately want not to show your files & folders. If both options are disabled, files & folders won’t show.
Show Files: Exclude any files from this option. If turned off, files won’t show.
Show Folders: Exclude any folders from this option. If turned off, folders won’t show.
Exclude Extensions: With the help of Exclude Extensions, you can simply exclude any files by the extensions you want. For example, you want to exclude (.jpg, .png, .ppt, .doc files). Simply type the extension in the exclude box and you get to go. Keep in mind, when Exclude All Expect is enabled, only the typed extension files will not show.
Exclude Names: You can also exclude any file or folder name by using Exclude Names. Type any file or folder name and your items will be excluded right away. Use Exclude All Expect to only show up typed names.
Max File Numbers to Show: Enter the number of how many files you want to show. Leave empty to show all files.
Click Next.
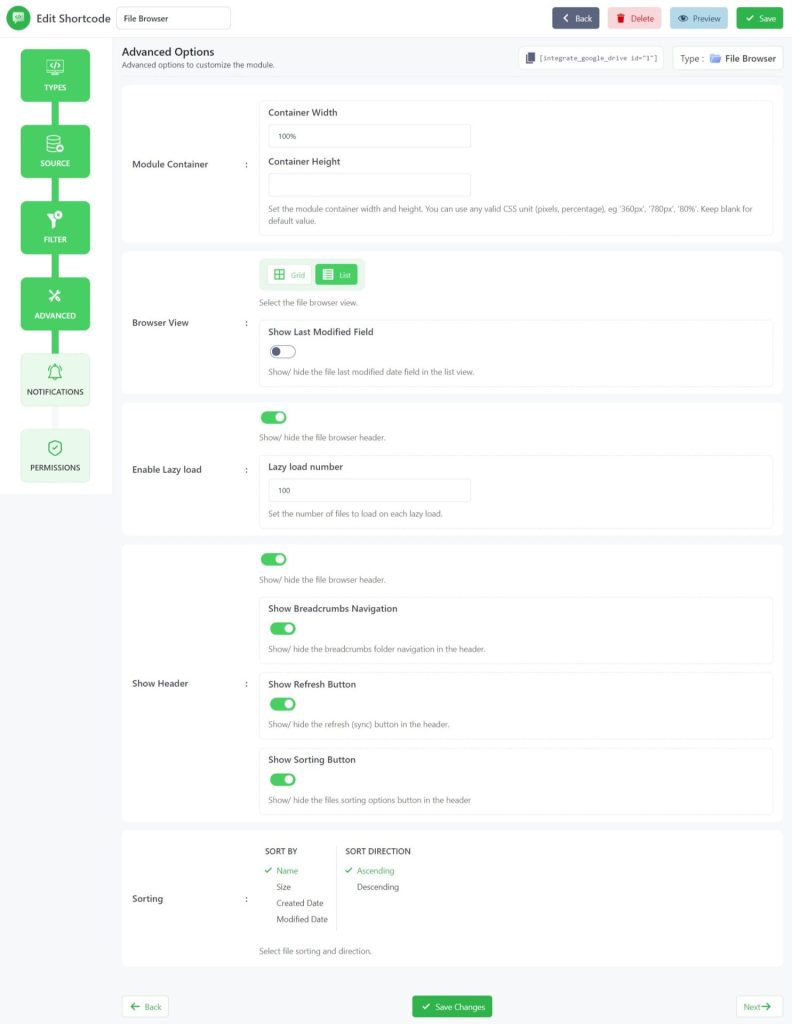
Step-6: Configuring Advanced Tab
The next step is to set up advanced options. There are multiple customizations you can do depending on your test and need. Let’s dive into the guide.
Module Width: From this section, you can customize the module width. The value is given in the percentage (%). Play with this section and customize what you need. Just change the value and test! You can use any valid CSS unit (pixels, percentage), eg ‘360px’, ‘780px’, ‘80%’
Module Height: It’s similar to the width. Normally it’s given auto. You can customize depending on your need. You can use any valid CSS unit (pixels, percentage), eg ‘360px’, ‘780px’, ‘80%’
Browser View: This option is given to let you change your browser view to List or Grid. Select anyone you feel better about and give it a test.
Show Header: It will Show or hide the file browser header. If you don’t want to show the file browser header turn it off. Otherwise, let it turn on! If the header is disabled users won’t be able to see Search, Refresh, and Breadcrumbs.
Sorting: Using this feature you can sort files by Name, Size, Created Date, Modified Date, Ascending, or Descending Direction. Select the option you are thinking to implement.
Click Next.
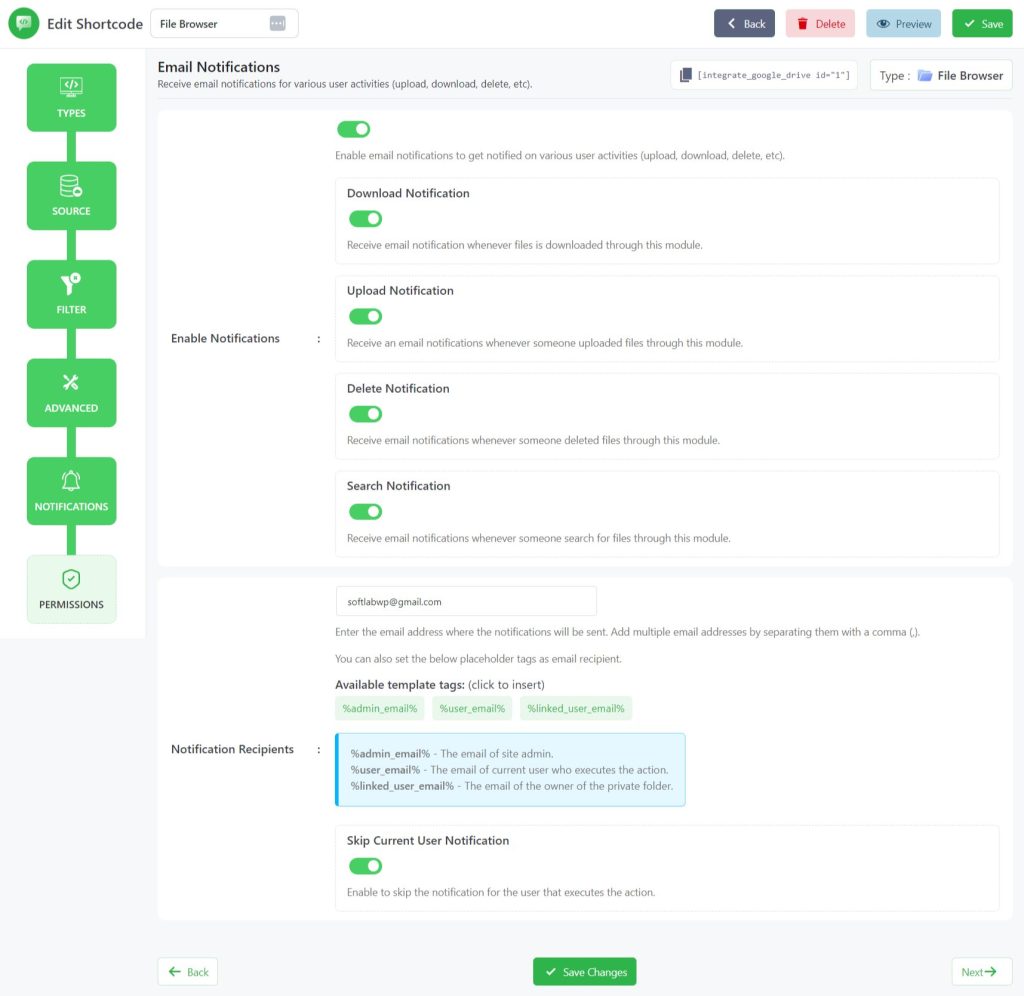
Step-7: Configuring Notifications Tab
From the Notifications Tab, you will mostly work on notification-related tasks. Ex: Email Notification, Upload Notification, and others.
Email Notification: Enable email notifications to get notified on various user activities (upload, download, delete, etc.).
Download Notification: Receive email notification whenever files are downloaded through this module.
Upload Notification: Receive email notifications whenever someone uploads files through this module.
Delete Notification: Receive email notifications whenever someone deletes files through this module.
Search Notification: Receive email notifications whenever someone searches for files through this module.
Notification Recipients: Enter the email address where the notifications will be sent. Add multiple email addresses by separating them with a comma (,). You can also set the below placeholder tags as email recipients. %admin_email%, %user_email%, %linked_user_email%
Skip Current User Notification: Enable to skip the notification for the user that executes the action.
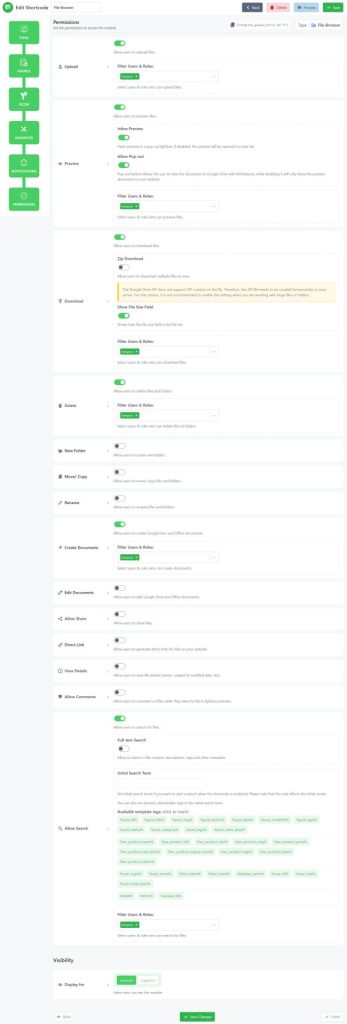
Step-8: Configuring Permissions Tab
After completing the Advanced options customization, head over to the Permission tab. Here you will mostly work on permission-related tasks.
Upload: While the option is enabled, users will be allowed to upload files. Otherwise, they won’t.
Preview: Allow users to preview files. Here you can also allow Inline Preview & Popout Preview for users.
Download: Allow users to download files and folders directly from your Google Drive once enabled. You can also allow zip download by enabling the Zip Download button.
Delete: Allow users to delete any files & folders
New Folder: Allow users to create new folders. Enable if you want to permit your users to create new folders.
Move/ Copy: Give permission to your users to move or copy files & folders from here to there.
Rename: Once the option is enabled, users can rename files & folders if they want to!
Edit Document: Allow users to edit Google Docs and Office documents.
Allow Share: Allow users to share files & folders. Once enabled, users will be able to share everything, otherwise won’t.
Direct Link: Allow users to generate direct links for files on your website.
View Details: Allow users to view file & folder details (owner, created & modified date, etc).
Allow Search: Allow users to search for files.
Display for: Using this option you can allow permission of your files & folder to everyone and logged-in users. You can also filter manually by user roles or any specific users.
Step-9: Share Files, Folders, and Documents
To share Files, Folders, and Documents on your WordPress page or post, copy the shortcode generated after creating the file browser module > and paste it where you want to share.
Conclusion
Sharing Google Drive files, folders, and documents on a WordPress website can be highly beneficial. It provides easy access, centralized storage, collaboration, enhanced functionality, and time-saving. You can easily share your Google Drive files on your WordPress website using various methods such as plugins and Google Drive embeds.
Using the Integrate Google Drive plugin is one of the best ways to share any type of Google Drive files, folders, or documents on your WordPress website. By following the above steps, you can link your Google account, create a file browser module, and configure the sources, excludes, and advanced tabs.
Video Tutorial
FAQs & Answers
Here are the most asked questions & answers when people are interested in sharing Google Drive Files, Folders and documents on a WordPress website.
What file types can be shared on a WordPress website using Google Drive?
Almost all file types can be shared on a WordPress website using Google Drive, including documents, spreadsheets, presentations, images, videos, and more.
Is it safe to share files using Google Drive on a WordPress website?
Yes, it is safe to share files using Google Drive on a WordPress website. Google Drive uses secure encryption protocols to protect your files, and the plugin used to share files on WordPress is regularly updated to ensure security.
Can I limit access to files shared on my WordPress website?
Yes, you can limit access to files shared on your WordPress website by configuring the sharing settings on Google Drive and the plugin settings on WordPress.
Can I share files with specific users or groups?
Yes, you can share files with specific users or groups by configuring the sharing settings on Google Drive.
No Comments yet!
Leave a reply