Using Google Drive files in your WordPress page or post can be a game-changer for both productivity and collaboration.
Whether you’re sharing important documents, showcasing multimedia files, or offering downloadable resources, embedding Google Drive files directly into your WordPress content makes accessing and managing these resources effortless for your visitors.
In this guide, we’ll walk you through the simple steps to use Google Drive files in your WordPress pages and posts. Let’s get started!
Advantages of Using Google Drive Files in WordPress Pages or Posts
Integrating Google Drive files into your WordPress site offers numerous advantages that enhance the functionality and efficiency of your content management.
Here are some key advantages explained in detail:
- Saves Server Space: Hosting large files directly on your WordPress server can slow down your site and consume valuable storage space. By using Google Drive, you offload storage demands to Google’s servers, helping to keep your website fast and responsive.
Read Also: How to upload large files on Google Drive
- Convenient Sharing: Sharing large files directly through your WordPress site can exceed server upload limits. Google Drive allows you to share large files with ease, with ZERO consumption of hosting.
- Easy Access: Embedding Google Drive files in your WordPress pages or posts allows visitors to view or download files without needing to navigate away from your site.
- Supports Various File Types: Google Drive supports a wide range of file formats, including documents, spreadsheets, presentations, images, and videos. This versatility means you can easily embed almost every type of content into your WordPress site.
- Cost-Effective: Google Drive offers a substantial amount of free storage space (15 GB), reducing the need for expensive hosting plans. For most users, this free storage is more than sufficient, making it a cost-effective solution for managing and sharing files.
- Increased File Security: Google Drive offers robust security features, including encryption and two-factor authentication. By hosting your files on Google Drive, you benefit from these advanced security measures, ensuring your files are safe from unauthorized access and data loss.
Note: Make sure you have installed & activated the Integrate Google Drive plugin and enabled Media Library Integration.
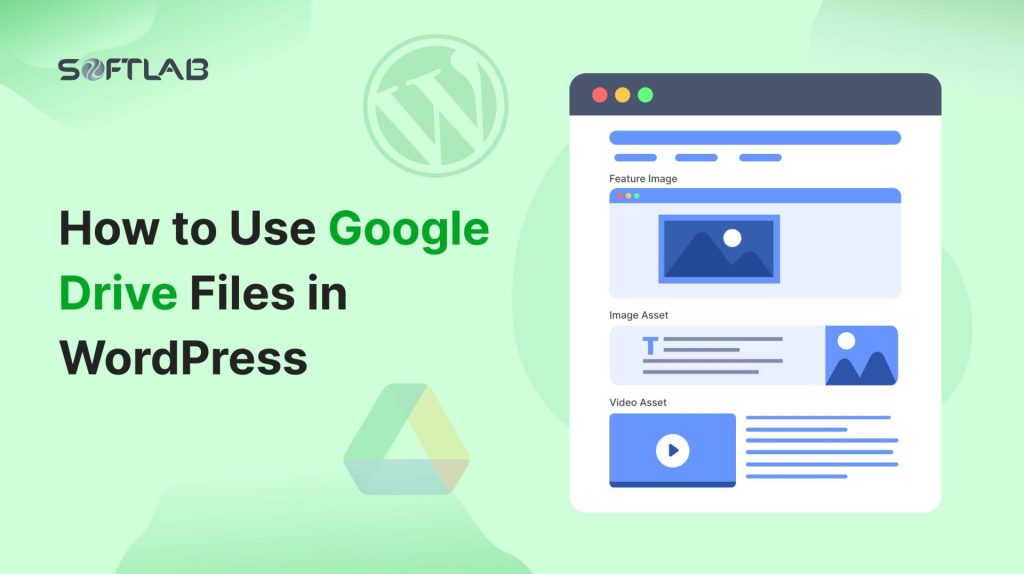
Use Google Drive Image as Feature Image
Setting a featured image for your WordPress post can significantly enhance its visual appeal and attract more readers. By using an image from Google Drive, you not only leverage your existing resources but also simplify the management of your media files.
Here’s how you can easily set a Google Drive image as the featured image for your post:
- Navigate to Any Post: Open your WordPress dashboard and go to the post you want to edit.
- Click the Post Tab: In the editor, locate and click on the “Post” tab on the right-hand side.
- Open Featured Image Section: Scroll down and click on the “Featured image” accordion item to expand it.
- Click Set Featured Image: Click on the “Set featured image” within the expanded section to select an image.
- Select Google Drive: In the media library, choose the option to browse images from Google Drive.
- Choose Your Image: Browse your Google Drive and select the image you want to use as the featured image.
- Set the Featured Image: After selecting the image, click the “Set featured image” button to finalize your choice.

Use Google Drive Images in Page or Post
Adding images to your WordPress pages or posts can greatly enhance the visual appeal and engagement of your content. Using images from Google Drive is a convenient way to utilize your existing media files and keep your content organized.
Here’s how you can easily add Google Drive images to your WordPress page or post:
- Navigate to Any Page or Post: Open your WordPress dashboard and go to the page or post where you want to add the image.
- Locate the Desired Placement: Scroll to the section of the content where you want to insert the image.
- Add Image Widget: Click to add a new block or widget, and select the “Image” option from the available blocks.
- Select Media Library: In the image block, choose the option to select a file from the “media library.”
- Click Google Drive: Within the media library, opt to browse images from Google Drive.
- Choose Your Image: Browse through your Google Drive and select the image you want to insert.
- Click Select: After selecting your image, click the “Select” button to add the image to your page or post.
Use Google Drive Videos in Pages or Posts
Adding videos to your WordPress pages or posts can significantly boost engagement and provide dynamic content for your visitors. Using videos stored in Google Drive is a practical way to leverage your existing media files while keeping your site organized.
Here’s how you can easily embed Google Drive videos into your WordPress page or post:
- Navigate to Any Page or Post: Open your WordPress dashboard and go to the page or post where you want to add the video.
- Locate the Desired Placement: Scroll to the section of the content where you want to insert the video.
- Add Video Widget: Click to add a new block or widget, and select the “Video” option from the available blocks.
- Select Media Library: In the video block, choose the option to select a file from the “media library.”
- Click Google Drive: Within the media library, opt to browse videos from Google Drive.
- Choose Your Video: Browse through your Google Drive and select the video you want to insert.
- Click Select: After selecting your video, click the “Select” button to add the video to your page or post.
Use Other Google Drive Files & Documents in Pages or Posts
Google Drive isn’t just for images and videos; it also allows you to easily embed documents, audio files, and other types of media directly into your WordPress pages or posts.
Here’s how you can add other Google Drive files and documents to your WordPress content:
- Navigate to Any Page or Post: Open your WordPress dashboard and go to the page or post where you want to add the file or document.
- Locate the Desired Placement: Scroll to the section of the content where you want to insert the file or document.
- Add File Widget: Click to add a new block or widget, and select the “File” option from the available blocks.
- Select Media Library: In the file block, choose the option to select a file from the “media library.”
- Click Google Drive: Within the media library, opt to browse files from Google Drive.
- Choose Your Document or File: Browse through your Google Drive and select the document, audio file, or other media you want to insert.
- Click Select: After selecting your file or document, click the “Select” button to add it to your page or post.

Conclusion
Integrating Google Drive files into your WordPress pages and posts can significantly enhance your site’s functionality and user experience.
Whether you’re embedding images, videos, or documents, Google Drive offers a seamless and efficient way to manage and display your media content.
By following the simple steps outlined in this guide, you can easily add Google Drive files to your WordPress page or post.
Using Google Drive not only saves server space but also provides robust security, real-time updates, and collaborative features.
No Comments yet!
Leave a reply