Don’t worry if you need to translate the Radio Player plugin into another language – it’s a straightforward process that you can easily learn by following the documentation. There’s no need to feel overwhelmed or intimidated, as the steps are simple and easy to follow. So go ahead and tackle this task with confidence!
Step-1: Install & Activate Loco Translate
- Navigate to Plugins in your WordPress dashboard.
- Click on Add New.
- In the search bar, type Loco Translate.
- Click Install Now next to the Loco Translate plugin.
- Once installed, click Activate to enable the plugin.
![]()
Manual Process
In loco translate you can translate your preferred language in the manual method (one by one). The manual method might take time to set up as it needs to input all translations one by one.
To set up manual translation follow the below steps:
- Navigate to Loco Translate > Plugins: Access the Loco Translate settings in your WordPress admin panel.
- Select Radio Player: Choose the Radio Player option for your translations.
- Click New Language: Start setting up a new language for translation.
- Choose your preferred language: Select the language you want to translate your plugin/theme into.
- Choose a Location: Specify where the translation files will be saved.
- Click Start Translating: Begin the translation process.
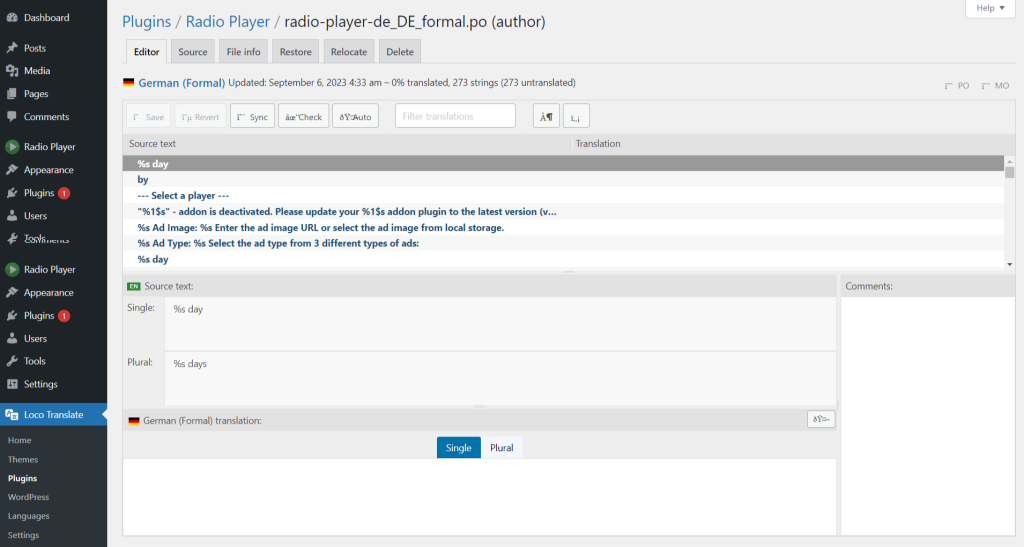
- Select Source Text: Choose the text that you want to translate from the source.
- Type the translated text in the translation input field: Enter the translated text into the provided field.
- Save: Save your translations to apply them.
Automatic Process
There are multiple automatic processes you can implement to translate the whole plugin into your local language. This will allow you to translate automatically with just one click.
Translate Using Add-on Plugin
Automatic translate can be implemented using 3rd party add-on plugin. Follow the below step to translate the Radio Player automatically with just one click.
Step-1: Install & Activate Automatic Translate Addon For Loco Translate
- Navigate to Plugins in your WordPress dashboard.
- Click on Add New.
- In the search bar, type Translate Addon For Loco Translate.
- Look for Automatic Translate Addon for Loco Translate by Cool Plugins.
- Click Install Now next to the plugin.
- After installation, click Activate to enable the plugin.
![]()
Step-2: Setup Auto Translation
- Navigate to Loco Translate: Access the Loco Translate settings in your WordPress admin panel.
- Click on the plugin (Radio Player): Select the plugin Radio Player you want to for translations.
- New Language: Start by creating a new language setup for translation.
- Choose a Language: Select the language you wish to translate the plugin into.
- Choose a Location: Specify where the translation files should be saved.
- Click Start Translating: Initiate the translation process.
- Click on Auto Translate Button: Use the automatic translation feature to generate initial translations.
- Click on Yandex Translate Button: Opt to use Yandex Translate for automated translation services.
- Click on Merge Translation: Combine and finalize the translations, incorporating any changes or additions.
![]()
Google Translate API Method
We are using Google Translate to translate the language (you can also use DeepL Translator, Lecto AI, Microsoft Translator, and others).
As we are going to use Google Translate, we will need Google Translate API to successfully translate everything automatically. Follow the below steps to complete the process successfully.
Step-1: Create a Project on Google Cloud
- Navigate to IAM & Admin in the Google Cloud Console.
- Click on Create a Project.
- Enter the Project Name, Organization, and Locations.
- Click on the Create button to finalize your project creation.

Step-2: Enable Cloud Translation API
- Navigate to APIs & Services in the Google Cloud Console.
- Click on Enabled APIs & Services.
- Click on Enable APIs & Services at the top of the page.
- In the search bar, type Translate.
- Select Cloud Translation API from the search results.
- Click on the Enable button to activate the API for your project.
![]()
Step-3: Create API Key
- Navigate to Credentials in the Google Cloud Console.
- Click on Create Credentials at the top of the page.
- Select API Key from the dropdown menu.
- Once the API key is created, copy the key by clicking the Copy icon next to it.
![]()
Step-4: Setup API Key in Loco Translate
- Navigate to Loco Translate in your WordPress dashboard.
- Click on Settings.
- Under the API Keys section, find the Google Translate API Key input field.
- Paste the API key you copied from the Google Cloud Console into this field.
- Click Save Changes to store your settings.
![]()
Step-5: Configure Loco Translate Settings Page
- Navigate to Loco Translate in your WordPress dashboard.
- Go to Plugins and select Radio Player.
- In the Overview Tab, click on New Language.
- Choose your preferred language from the dropdown.
- Select the Location for the translation files (usually System or Custom).
- Click Start Translating.
- Click the Auto button at the top.
- Choose Google Translate from the available options.
- Click the Translate button to automatically translate the strings.
- Finally, click Save to save the translations.
Congratulations! The Radio Player plugin has now been translated into your selected language. You can now fully enjoy and understand our plugin in your local language.