


Using the Media Player module, you can easily play audio and video files from Google Drive on your WordPress website. This feature enhances the user experience by keeping visitors on your site. With embedded media, there’s no need for external links or downloads. It simplifies media management and makes your content more engaging and interactive.
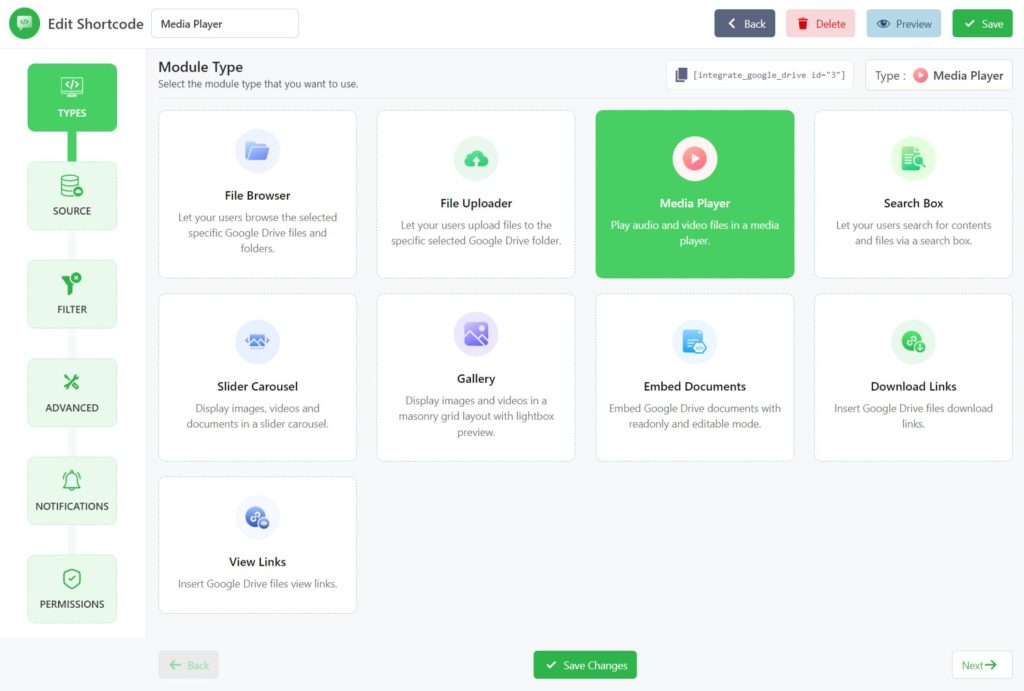
Step-1: Choose Media Player Module
To create a Media Player Module, click on the Shortcode Builder menu from the admin dashboard menu. Create a new Shortcode > select the Media Player module from the Types tab.
Rename the shortcode title from the top left side of the WordPress dashboard depending on your project type.
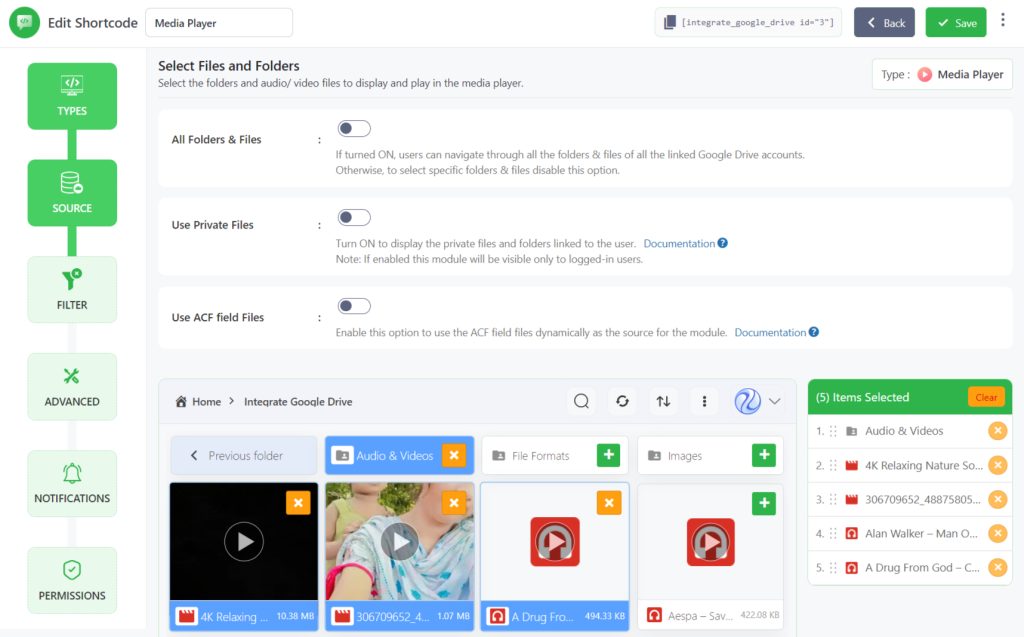
Step-2: Configure Source Tab
Now you will be redirected to the Source tab. Here you need to select your media files from your linked Google Drive. Select your media files by pressing the plus sign.
You will discover your selected files in the selected files list on your screen. You can drag them up or down to change their orders.
- All Folders & Files: If All Folders & Files is enabled, visitors can navigate through all the folders & files of all the linked Google Drive accounts.
- Use Private Folder: Turn ON to upload the files in the private folder linked to the user. Note: If enabled this module will be visible only to logged-in users.
- Create Private Folder: Turn ON to create and link a folder automatically to the user who has not linked any folder yet while the user will view the module.
- Naming Template: Set the folder name template for the automatically created private folders.
- Parent Folder: Select the parent folder where the automatically created private folders will be created.
- Template Folder: Select the template folder that will be copied to the new private folder.
- Merge Folders: Allow merging folders if a folder with the same name already exists.
- Create Private Folder: Turn ON to create and link a folder automatically to the user who has not linked any folder yet while the user will view the module.
- Use ACF field Files: Enable this option to use the ACF field files dynamically as the source for the module. Enter the ACF field name in the ACF Field Key input box to use the files from the ACF field.
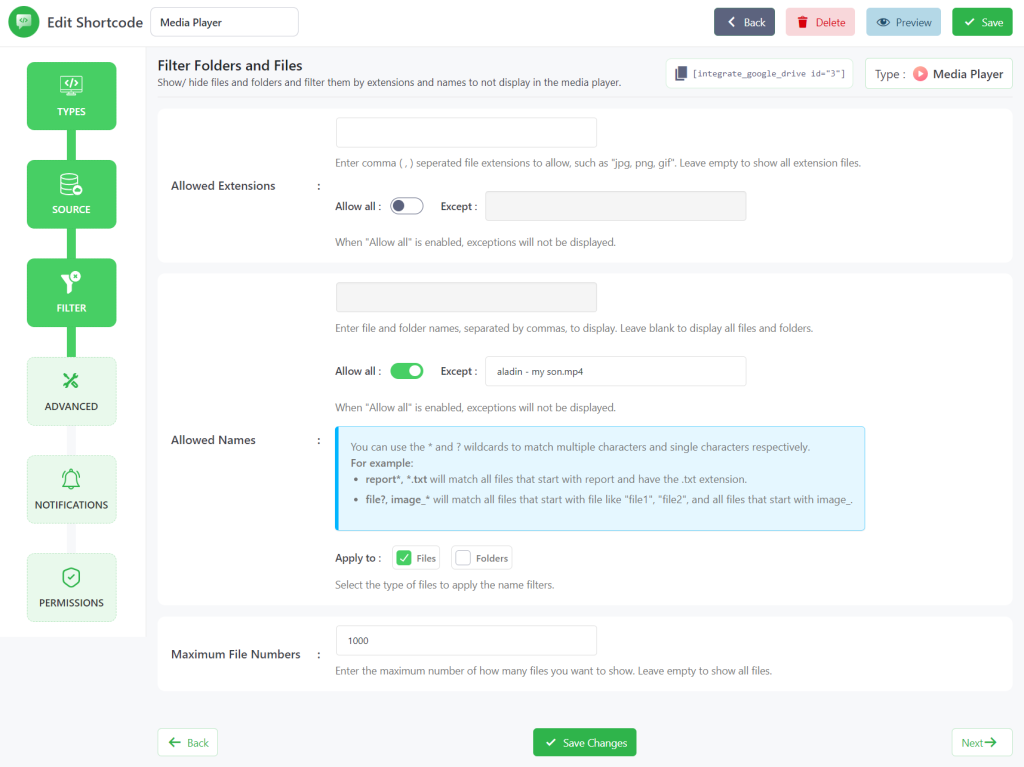
Step-3: Configure Filter Tab
Now you are in the Filter Tab. Where you can customize each and every media file that you want to display or hide.
- Allowed Extensions: Enter comma (,) separated file extensions to allow, such as “jpg, png, gif”. Leave empty to show all extension files. When “Allow all” is enabled, exceptions will not be displayed.
- Allowed Names: Enter file and folder names, separated by commas, to display. Leave blank to display all files and folders. When “Allow all” is enabled, exceptions will not be displayed.
- Maximum File Numbers: Enter the maximum number of how many files you want to show. Leave empty to show all files. Click Next.
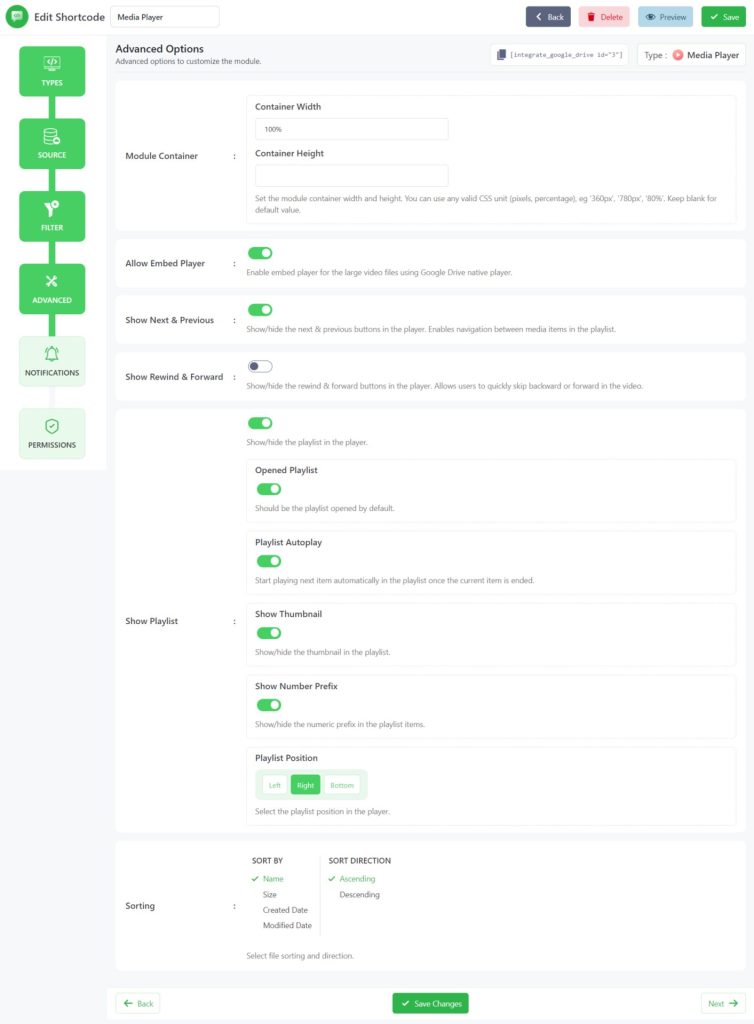
Step-4: Configure Advanced Tab
From the next Advanced Options, You can customize your media player and files depending on what’s going on in your mind.
- Module Container: Set the module container width and height. You can use any valid CSS unit (pixels, percentage), eg ‘360px’, ‘780px’, ‘80%’. Keep blank for a default value.
- Allow Embed Player: Enable embed player for large video files using Google Drive native player.
- Show Next & Previous: Show/ hide the next/previous buttons in the player.
- Show Rewind & Forward: Show/hide the rewind & forward buttons in the player. Allows users to quickly skip backward or forward in the video.
- Show Playlist: Show/hide the playlist in the player.
- Opened Playlist: This should be the playlist opened by default.
- Playlist Autoplay: Start playing the next item automatically in the playlist once the current item is ended.
- Show Thumbnail: Show/hide the thumbnail in the playlist.
- Show Number Prefix: Show/hide the numeric prefix in the playlist items.
- Playlist Position: Select the playlist position in the player (Left, Right, or Bottom)
- Sorting: Select file sorting and direction. Now click Next.
Note: If your file size is greater than 100 MB, it will play as an embed. Otherwise, files will play as it is.
Step-5: Configuring Notifications Tab
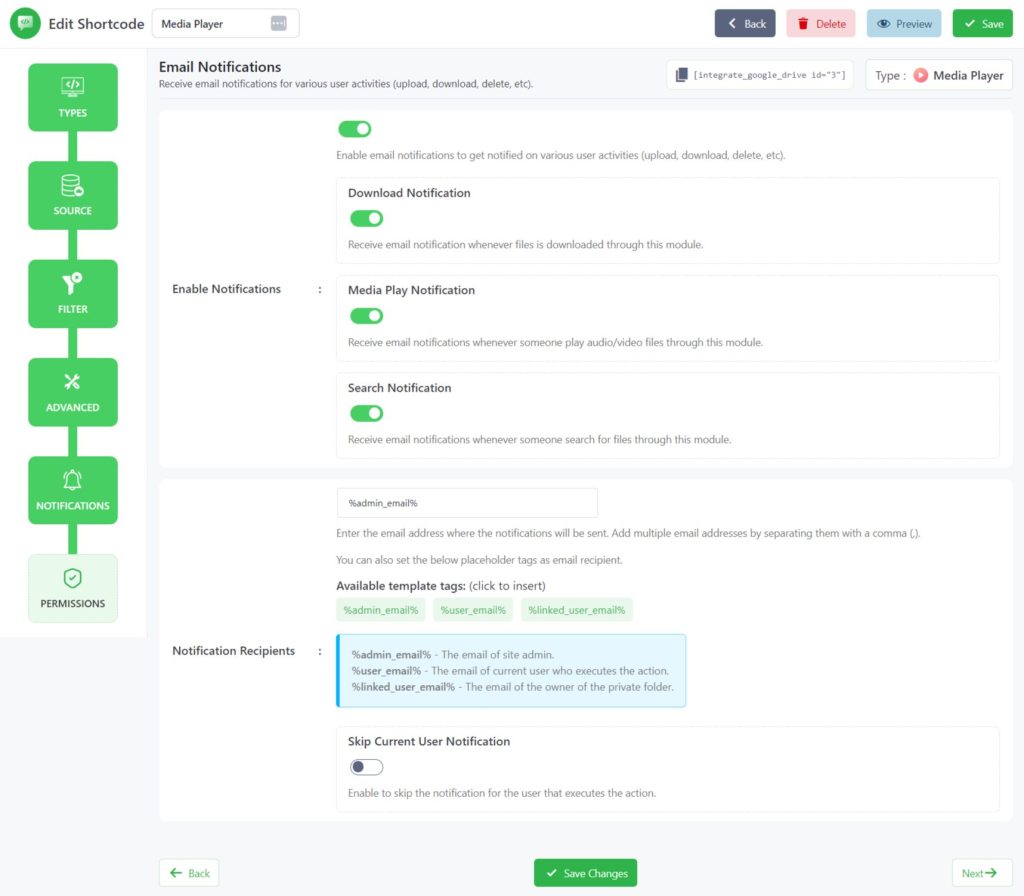
Now you will be redirected to the Notifications tab where you will customize notification settings configuration.
- Enable Notifications: Enable email notifications to get notified on various user activities (upload, download, delete, etc).
- Download Notification: Receive an email notification whenever files are downloaded through this module.
- Media Play Notification: Receive email notifications whenever someone plays audio/video files through this module.
- Search Notification: Receive email notifications whenever someone searches for media files through this module.
- Notification Recipients: Enter the email address where the notifications will be sent. Add multiple email addresses by separating them with a comma (,). You can also set the below placeholder tags as the email recipient. Ex: %admin_email%, %user_email%, %linked_user_email%
- Skip Current User Notification: Enable to skip the notification for the user that executes the action.
Step-6: Configuring Permissions Tab
Now you will be redirected to the Permissions tab. Here you will mostly work on permission-related tasks for your Media Player.
- Download: Allow users to download files.
- Filter Users & Roles: Select users & roles who can download files.
- Allow Search: Allow users to search for files.
- Full-text Search: Allows searching in file content, descriptions, tags, and other metadata.
- Initial Search Term: Set initial search terms if you want to start a search when the shortcode is rendered. Please note that this only affects the initial render. You can also set dynamic placeholder tags to the initial search term. Ex: %post_id%, %post_title%, %post_slug%
- Filter Users & Roles: Select users & roles who can search for files.
- Usage Limits: Enable download restrictions for users to control the download access for this module.
- Daily Downloads Limit: Set the maximum number of downloads allowed per day for users. Keep blank for unlimited.
- Daily Download Limit / File: Set the maximum number of times the same file can be downloaded by users per day. Keep blank for unlimited.
- Daily Bandwidth Limit: Set the maximum bandwidth (MB) allowed per day for users. Keep blank for unlimited.
- Exclude Users & Roles: Select the roles and users who will be excluded from the download restrictions.
- Exclude All: When activated, the download restrictions will be only applied to the selected roles and users.
- Display for: Using this option you can allow permission of your media files to everyone and logged-in users. You can also filter manually by user roles or any specific users.
- Show Access Denied Message: Show a message to users who don’t have access to the module. You can enter a message you want to show to users who don’t have access to the module.
![]()
Click Save Changes and copy the shortcode from the shortcode builder page.
Now you can use the shortcode to display your Google Drive media files inside a responsive media player with the help of the Media Player module, inside any posts or pages.
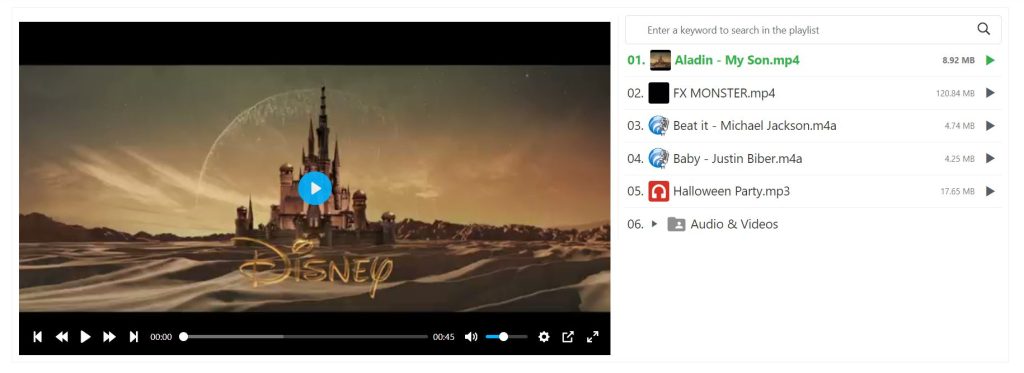
Output
This is how the media player will look like once you embed it inside any of your pages or posts.