The Watermark Protection feature in Integrate Google Drive lets you add custom watermarks to your content to help protect images from unauthorized use. It also helps display your brand identity or ownership details directly on previews.
With these settings, you can control how the watermark looks and where it appears. You can easily adjust its appearance and placement to match your branding while keeping a clean viewing experience.
This guide explains how to configure Watermark Protection, customize watermark appearance, and set watermark placement for your Google Drive module files to ensure better content protection.
Enable Watermark Protection
After enabling Watermark Protection, you can choose where watermarked images should be displayed. Watermarked copies are generated and served to visitors while the original Google Drive files remain unchanged.
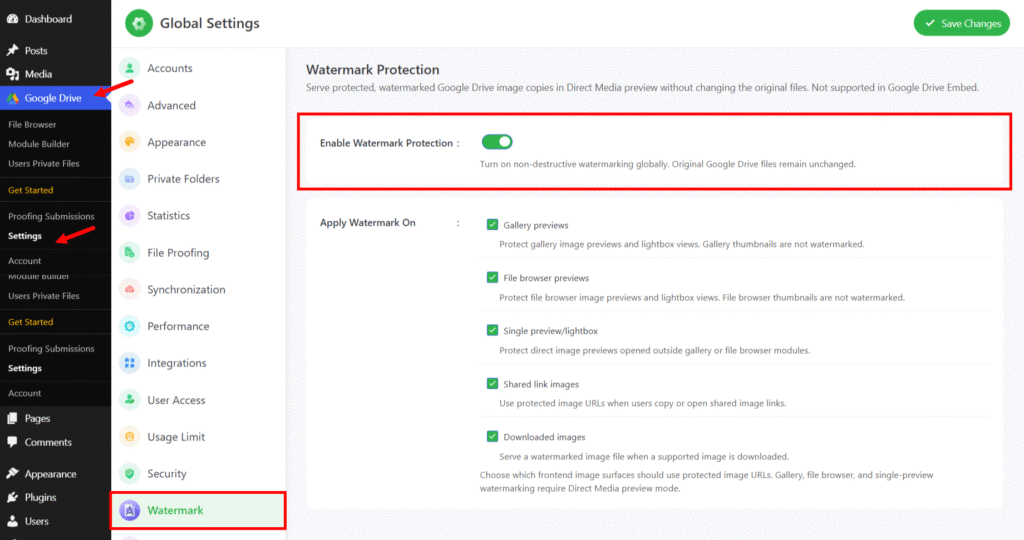
To enable Watermark Protection, from the Google Drive plugin, navigate to Settings > Watermark Protection > Enable Watermark Protection.
- Enable Watermark Protection: Enable this option to activate watermark protection globally for supported image previews, shared links, and downloads.
- Apply Watermark On: Select the image surfaces where watermarked image URLs should be used.
- Gallery Images: Apply watermarks to gallery image previews and lightbox views. Gallery thumbnails remain unwatermarked.
- File Browser Images: Apply watermarks to file browser image previews and lightbox views. File browser thumbnails remain unwatermarked.
- Direct Image Previews: Apply watermarks to images opened directly outside Gallery and File Browser modules.
- Shared Image Links: Use protected image URLs when users open or copy shared image links.
- Downloaded Images: Serve a watermarked image file when users download supported images.
Customise Text Watermark
Configure and style your text watermark by setting the content, adjusting appearance options like size, color, and opacity, and defining its placement on the image.
- Watermark Type: Choose the type of watermark you want to apply to your Google Drive files.
- Select Text Watermark: Use a text-based watermark with optional dynamic tags such as site name, file name, date, or user name.
- Content: Define the watermark content.
- Watermark Text: Enter the text you want to display as a watermark (e.g., “Watermark Here”).
- Reset: Restore the default watermark text.
- Insert Tags: Use dynamic tags to automatically insert variable data into the watermark text.
- Appearance: Control the visual styling of the watermark.
- Base Text Size: Set the font size for the watermark text. It scales automatically based on image size (default: 25px).
- Color: Choose the watermark color using a color picker or hex value (default: #111827).
- Opacity: Adjust the transparency of the watermark. Lower values create a softer effect (default: 66%).
- Placement: Define how and where the watermark is positioned on images.
- Position: Select the watermark placement on the image (e.g., top, center, bottom, or corners).
- Distance from Edge: Set spacing between the watermark and image edges (default: 24px).
- Repeat Across Image: Enable this option to tile the watermark across the entire image for stronger protection.

Customise Image Watermark
Configure your image-based watermark by uploading a logo or image and adjusting its appearance and placement on generated image copies.
- Watermark Type: Choose the type of watermark you want to apply to your Google Drive files.
- Select Image Watermark: Use a logo or image as a watermark over your generated image copies.
- Source: Select and manage the image used as the watermark.
- Select Image: Choose a watermark image from the Media Library. Transparent PNG is recommended for best results.
- Replace: Replace the currently selected watermark image with a new one.
- Remove: Remove the existing watermark image.
- Appearance: Adjust how the watermark image looks on the output.
- Watermark Width: Set the watermark size relative to the image width (default: 15%).
- Opacity: Control watermark transparency. Lower values create a lighter watermark effect (default: 66%).
- Placement: Define how the watermark is positioned on images.
- Position: Choose where the watermark appears on the image (e.g., corners, center, or edges).
- Distance from Edge: Set spacing between the watermark and image borders (default: 24px).
- Repeat Across Image: Enable this option to tile the watermark across the entire image for enhanced protection.
-
Cache: Manage how watermarked images are stored and refreshed for faster loading and optimized performance.
-
Clear Watermark Cache: Clear the existing cache to rebuild all generated watermarked images immediately after making changes to watermark settings or assets.
-
-
Output Format: Choose the file format used for generated watermarked images.
-
Maximum Processing Pixels: Large source images are resized to this pixel limit before watermarking to avoid memory issues.

Enable Watermark Inside Module
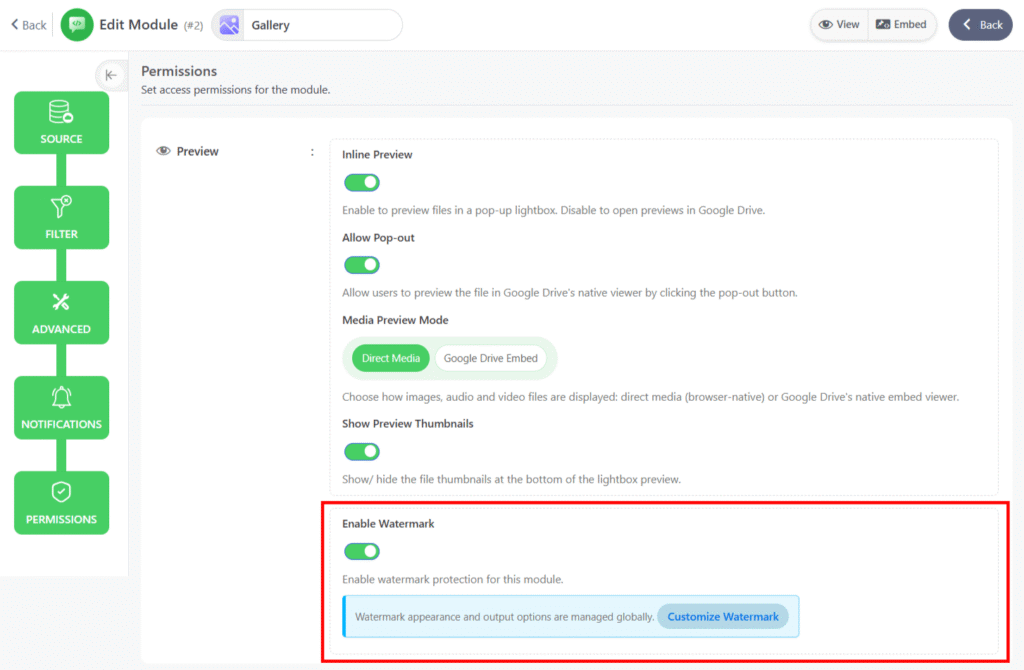
Manage Watermark Inside Module allows you to activate watermark protection for specific modules such as File Browser or Gallery directly from the module settings.
To manage the Watermark Inside Module, navigate through the following steps:
- Navigate to Google Drive from your WordPress dashboard.
- Click on Module Builder.
- Select your preferred module and open the Permissions tab.
- Toggle the Enable Watermark option to control watermark protection for that module.
Output